Hospital
Hospitals and health centres with outpatient, emergency, inpatient, theatre, maternity, diagnostics, pharmacy, stores, HR and finance.
Screenshots come from GomoClinic Demo Hospital, a demo facility with made-up patients and staff. Your own screens show your facility's data, and only the modules in your plan. Edition: 5 October 2026.
1Getting started
GomoClinic runs in a web browser (Chrome, Edge, Firefox or Safari) on a computer, tablet or phone. Nothing needs installing. Your facility has its own private space: nobody outside your facility can see your records.
Signing in
- Open https://gomoclinic.com/login (or the address your administrator gave you).
- Enter the email your administrator registered for you, and your password.
- Click Sign In. You land on your dashboard.
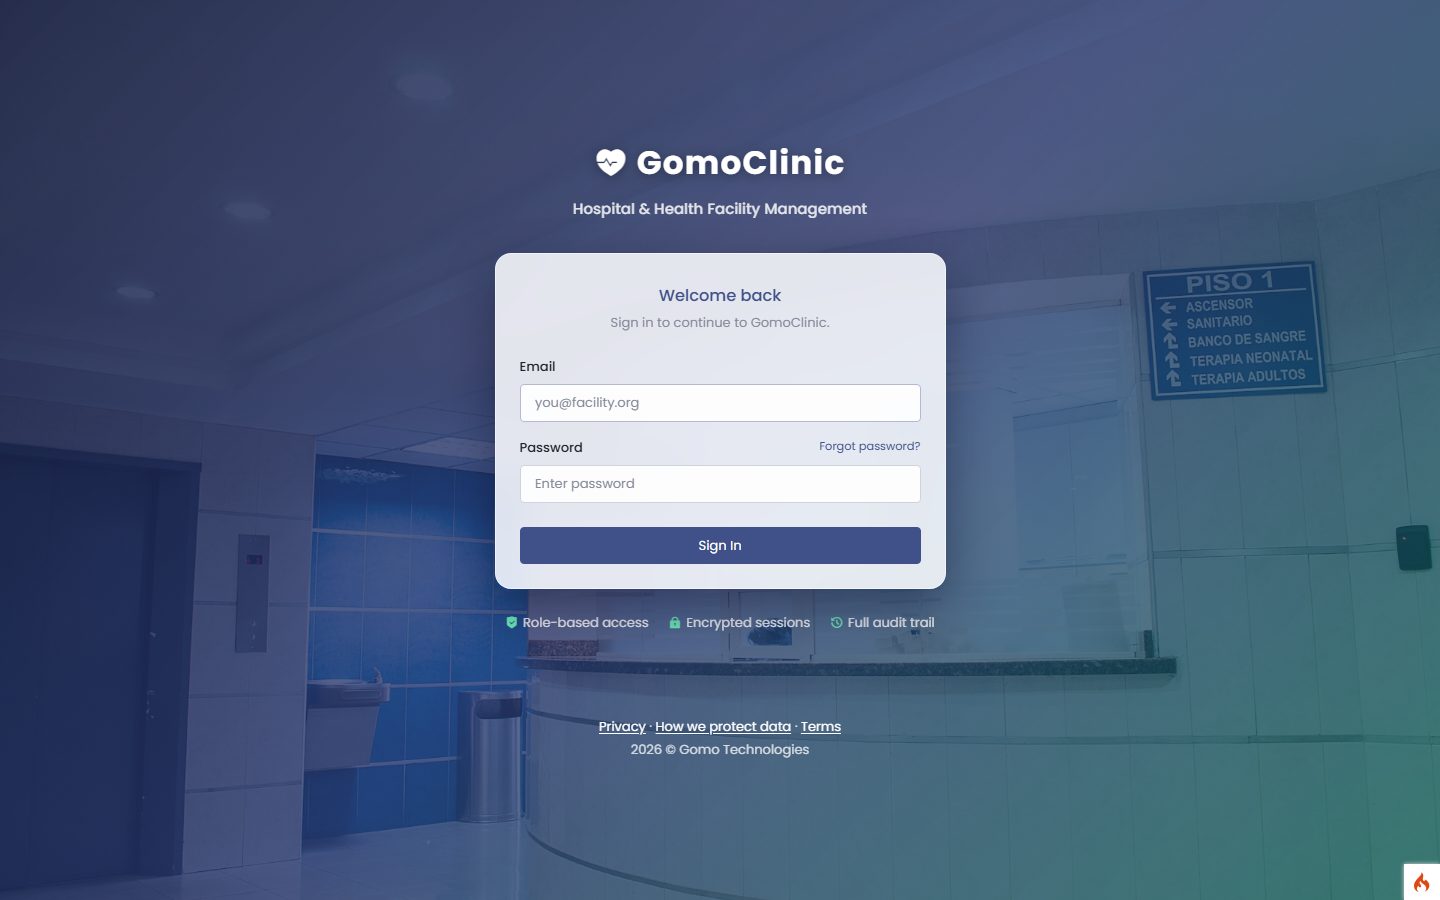
The first time you sign in, GomoClinic asks you to choose your own password (at least 10 characters). If you received a welcome email, use its Set my password button instead: the link works once and expires after 72 hours.
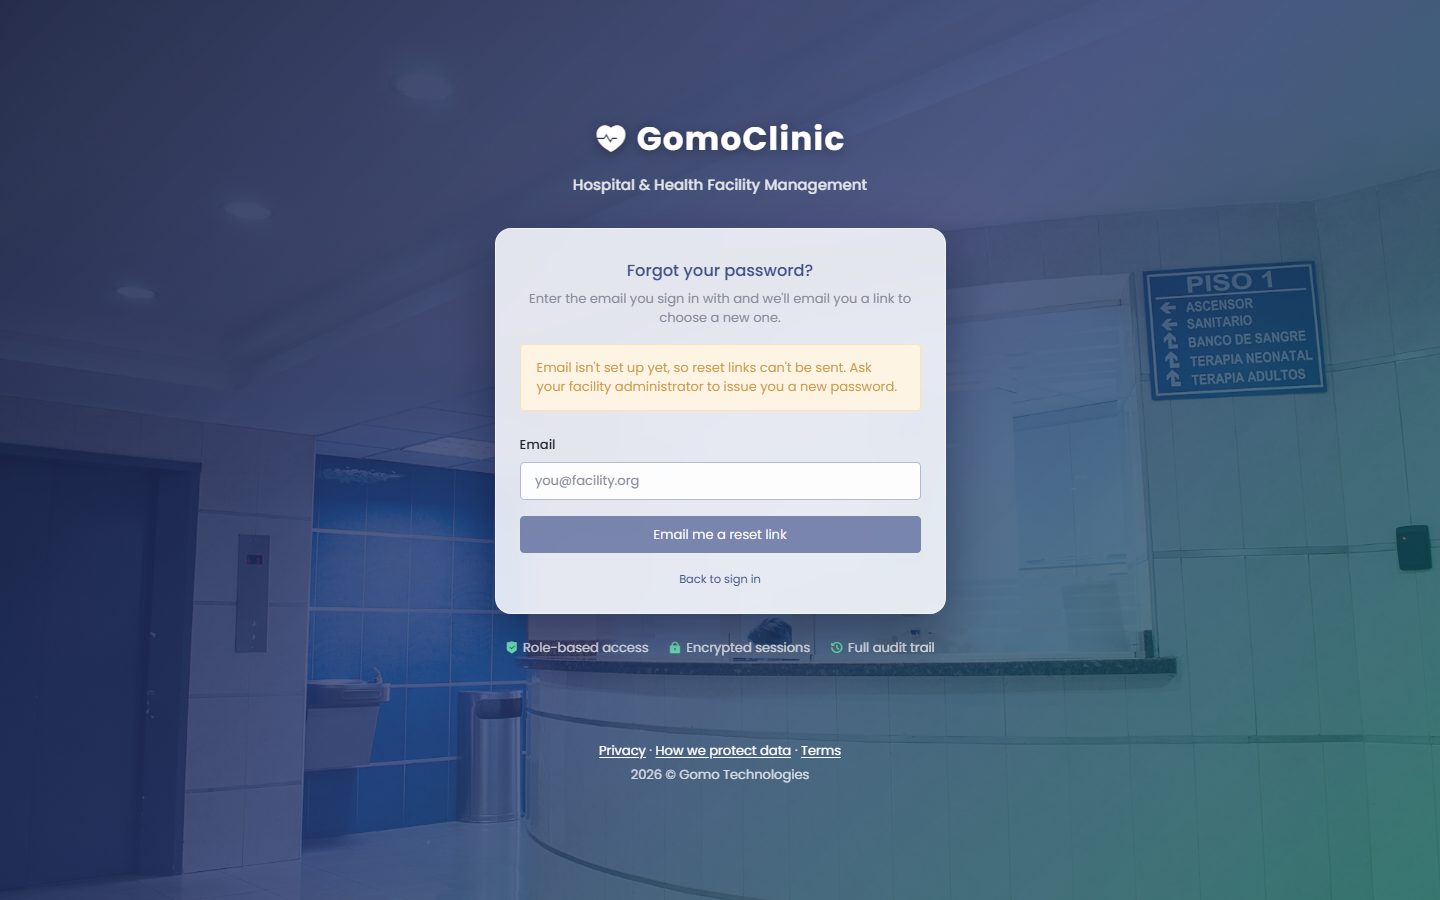
Forgot your password?
- On the sign-in page click Forgot password?.
- Enter your email and click Email me a reset link.
- Open the email and click Reset my password within 60 minutes, then choose a new password.
Finding your way around
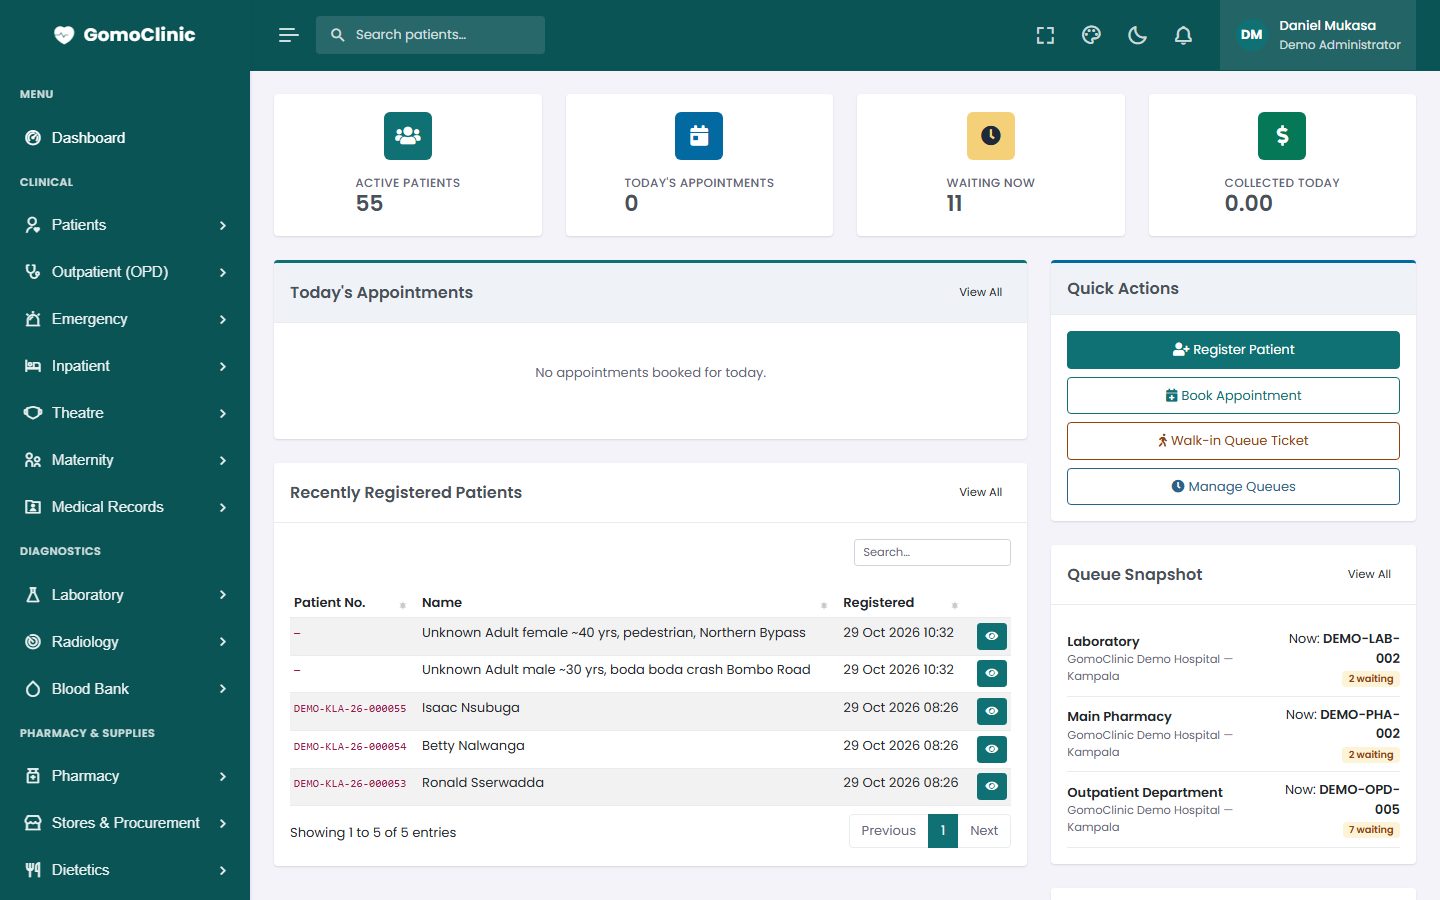
- Left menu: every module you are allowed to use, grouped by area. You only see what your role permits and what your facility's plan includes, so two colleagues may see different menus.
- Search patients (top left): type a name, phone number or patient number from any page.
- Bell (top right): your notifications. A red number shows how many are unread.
- Your name (top right): change password, Help & support, notifications, your facility's subscription and sign out.
- The palette and moon icons change the colours and switch between light and dark mode.
2Patients, appointments and the queue
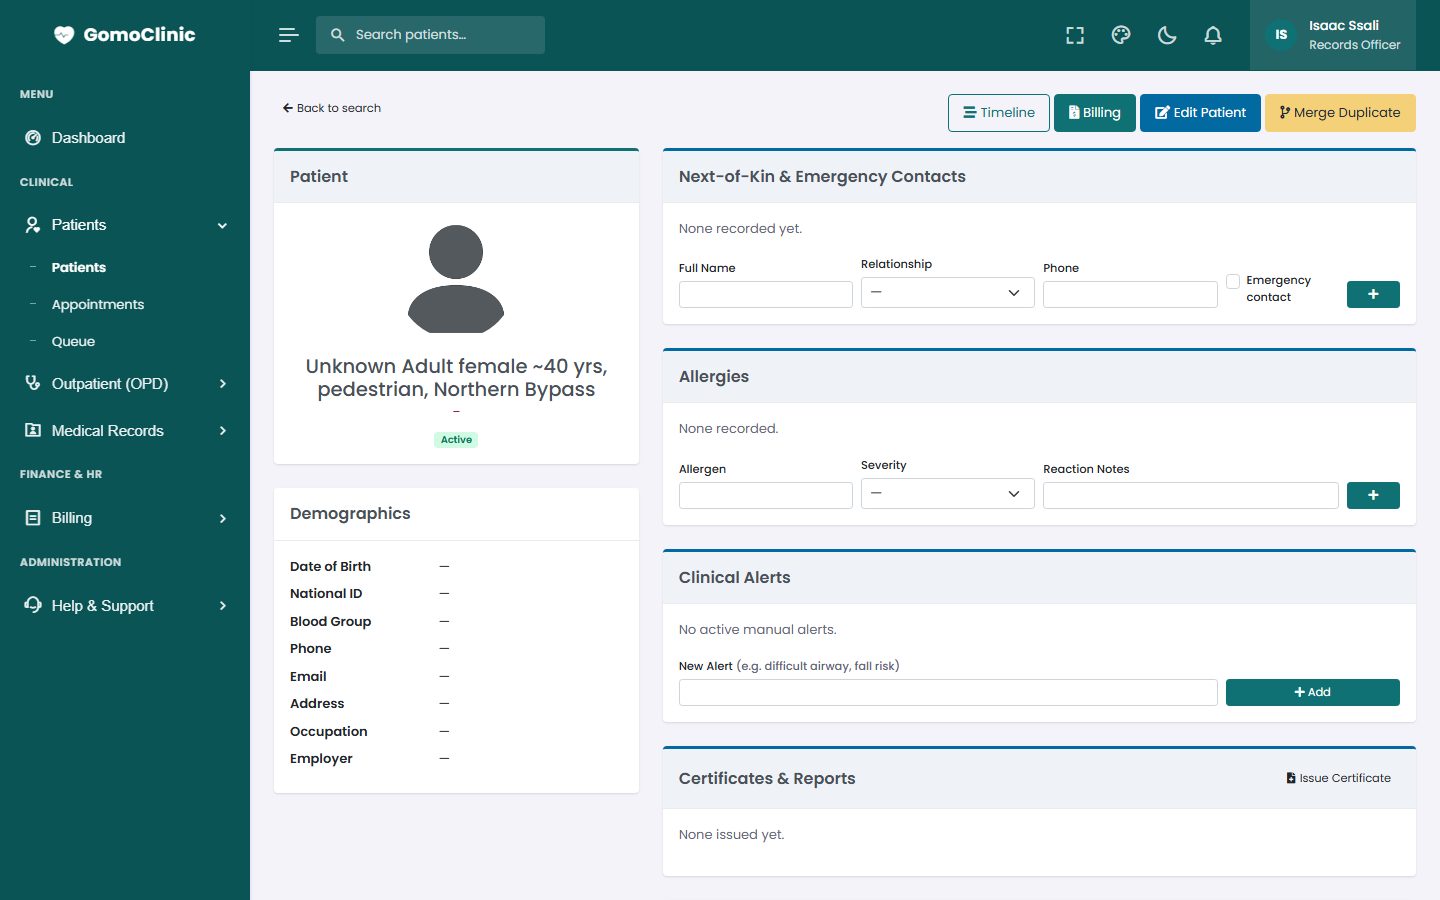
Every patient has one record that follows them through the facility: registration details, next of kin, allergies, visits, results, prescriptions and bills.
Registering a patient
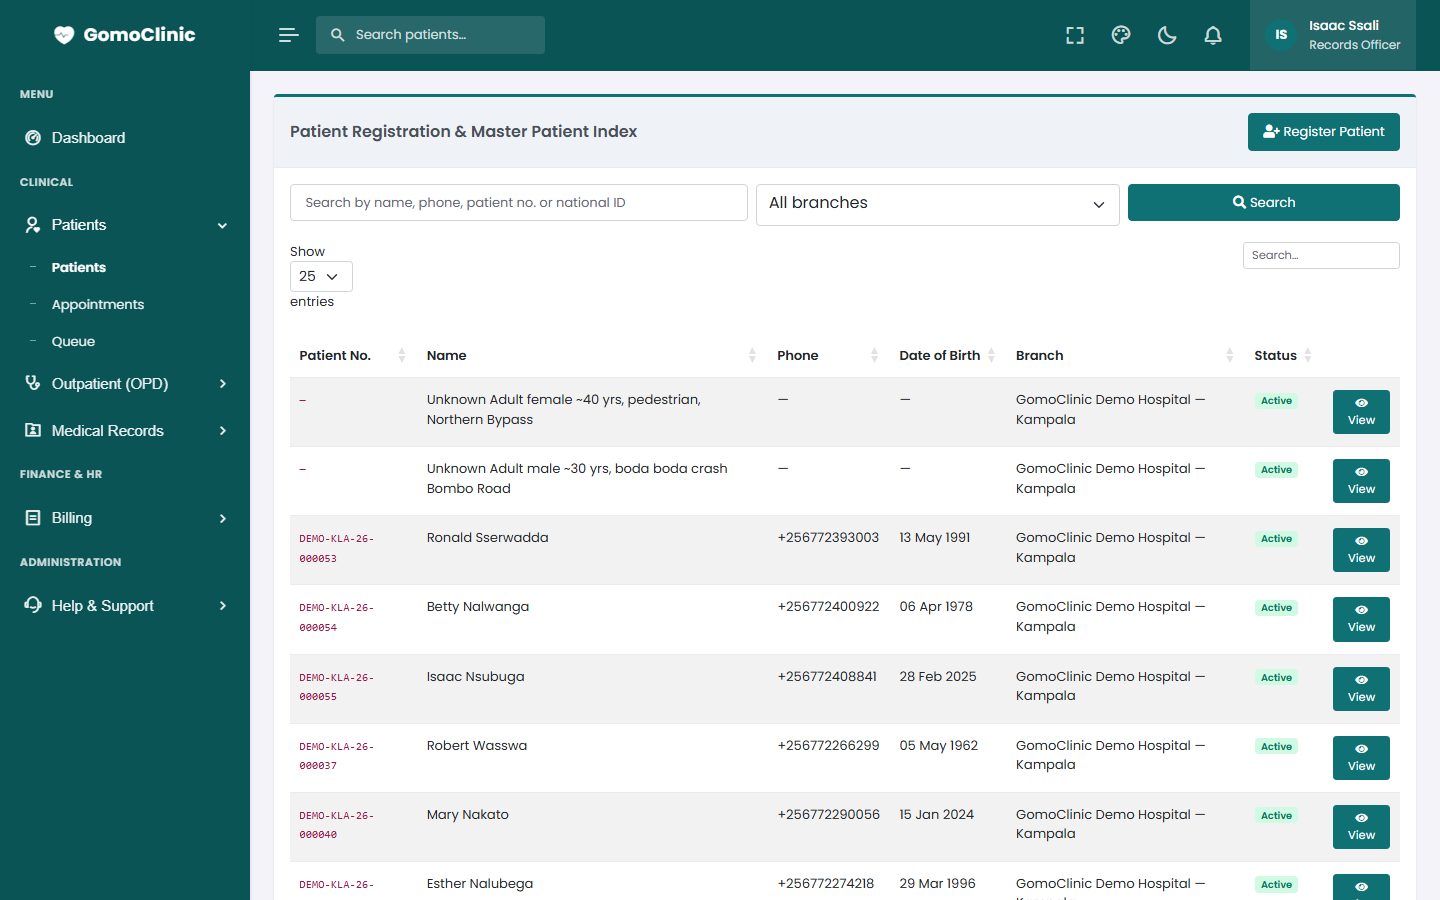
- Go to Patients → Patients and click Register Patient (also on the dashboard under Quick Actions).
- First search by name or phone to make sure they are not already registered. Duplicate records split a person's history.
- Fill in the details. Fields with a red star are required. Add allergies here: they show as a red alert on every screen for that patient.
- Click Save. GomoClinic gives the patient a number such as
DEMO-KLA-26-000158, made from the branch code, year and a running number.
Appointments
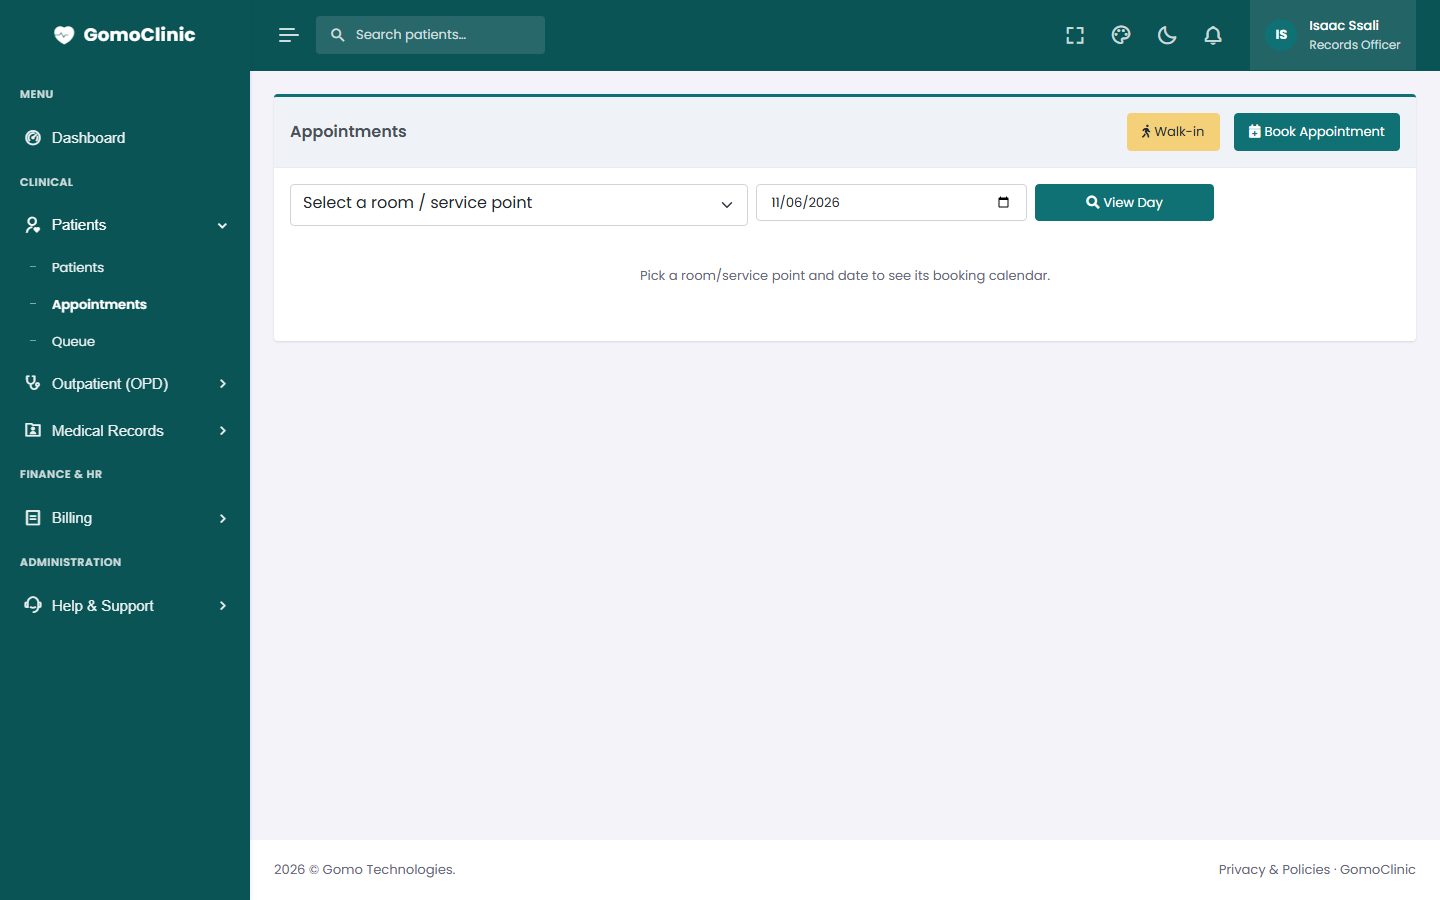
Book future visits at Patients → Appointments. Choose the patient, clinician, date and time. GomoClinic warns you if the slot clashes with another booking. On the day, mark the patient as arrived to put them in the queue.
The queue
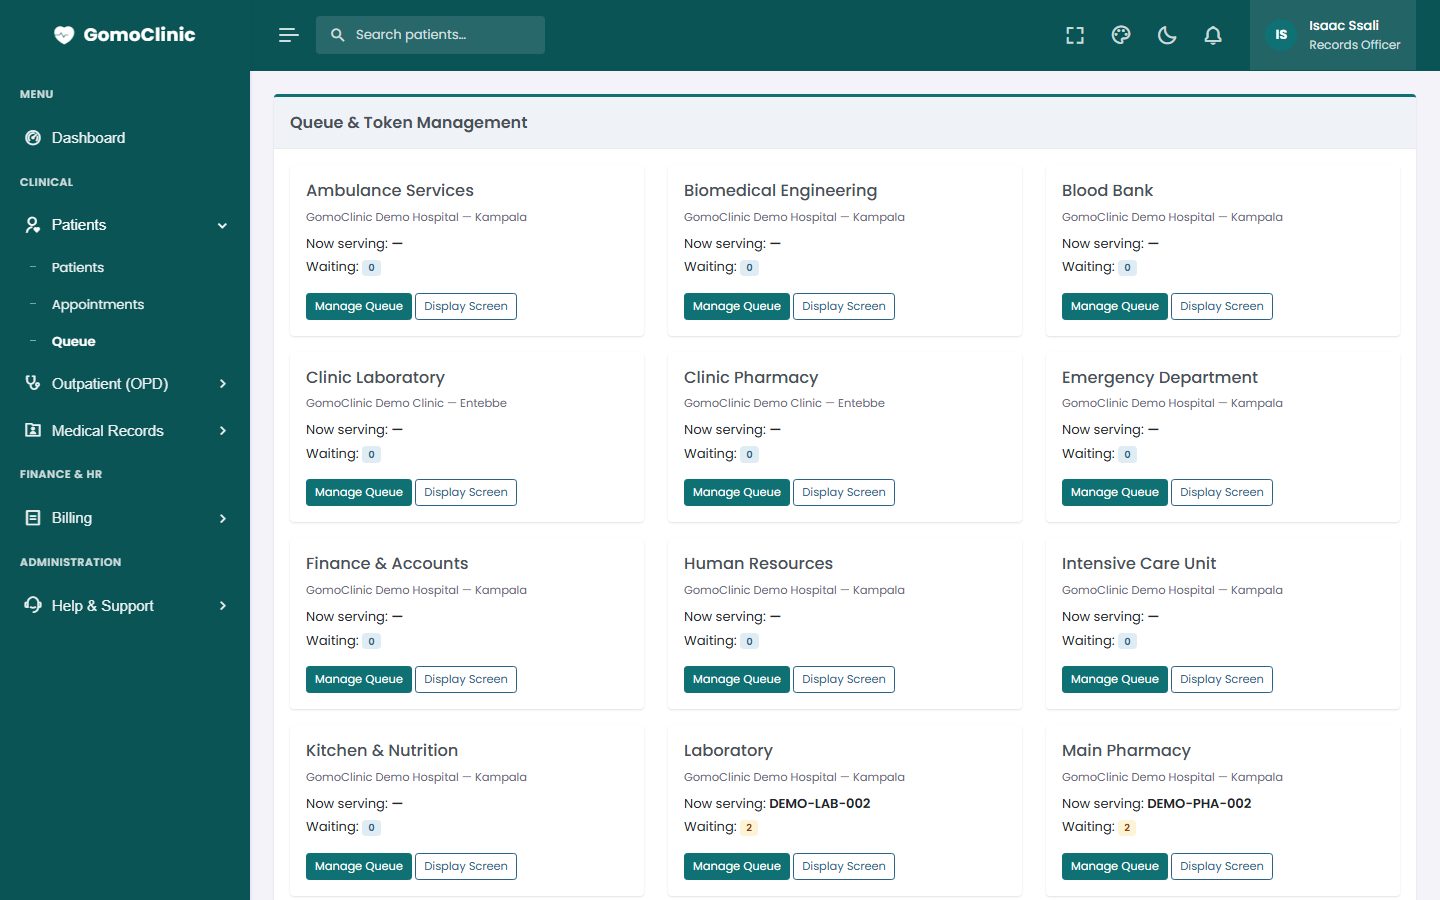
Walk-in patients get a queue ticket from the dashboard (Walk-in Queue Ticket) or Patients → Queue. Staff call the next person from their service point, and the queue shows who is waiting, being served or done, with waiting times.
3Consultations (outpatient)
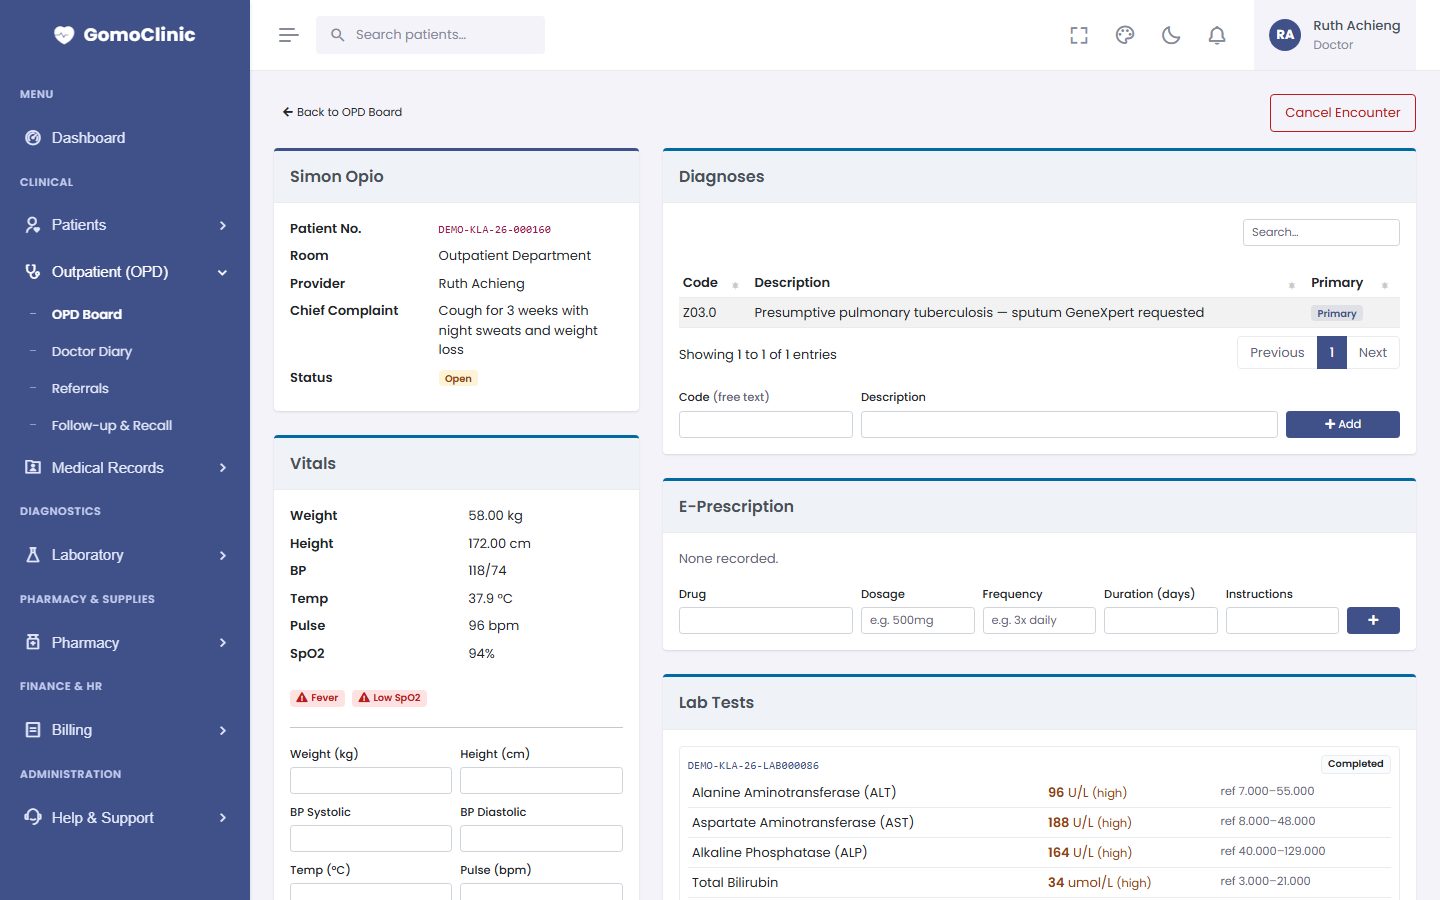
The outpatient module covers the consultation from triage to the doctor's plan: vitals, diagnosis, prescriptions, laboratory requests, referral and follow-up.
The OPD board
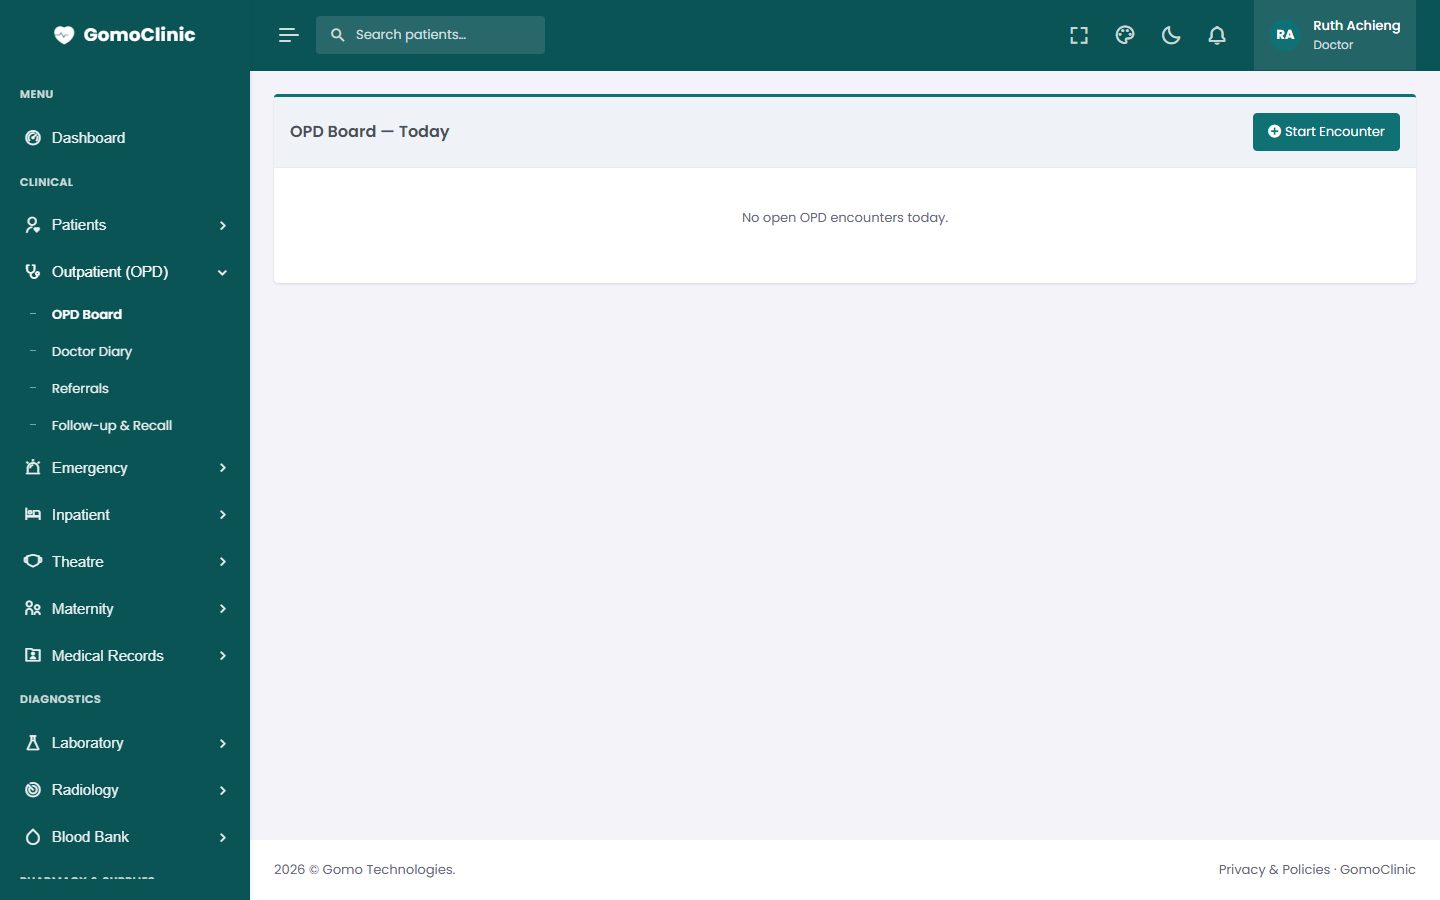
Outpatient (OPD) → OPD Board lists today's encounters with their status. Click a patient to open the encounter.
Conducting a consultation
- Vitals. The nurse or doctor enters weight, height, blood pressure, temperature, pulse and oxygen saturation. Out-of-range values are flagged automatically (for example Fever or Low SpO2).
- Chief complaint and notes. Record the presenting complaint and examination findings.
- Diagnoses. Add one or more diagnoses with a code and description, and mark the primary one.
- E-Prescription. Choose the drug, dosage, frequency, duration and instructions, then click +. The prescription goes straight to the pharmacy queue, and allergies and interactions are checked.
- Lab tests. Order tests; results appear on this page as soon as the laboratory releases them, with abnormal values highlighted.
- Finish. Book a follow-up or a referral if needed and close the encounter. Charges for the consultation, tests and drugs go to the patient's bill.
Doctor diary, referrals and follow-ups
- Doctor Diary: each clinician's sessions, leave and bookings.
- Referrals: referrals to specialists or other facilities, with their status.
- Follow-up & Recall: patients due back, so nobody is forgotten.
4Emergency and triage
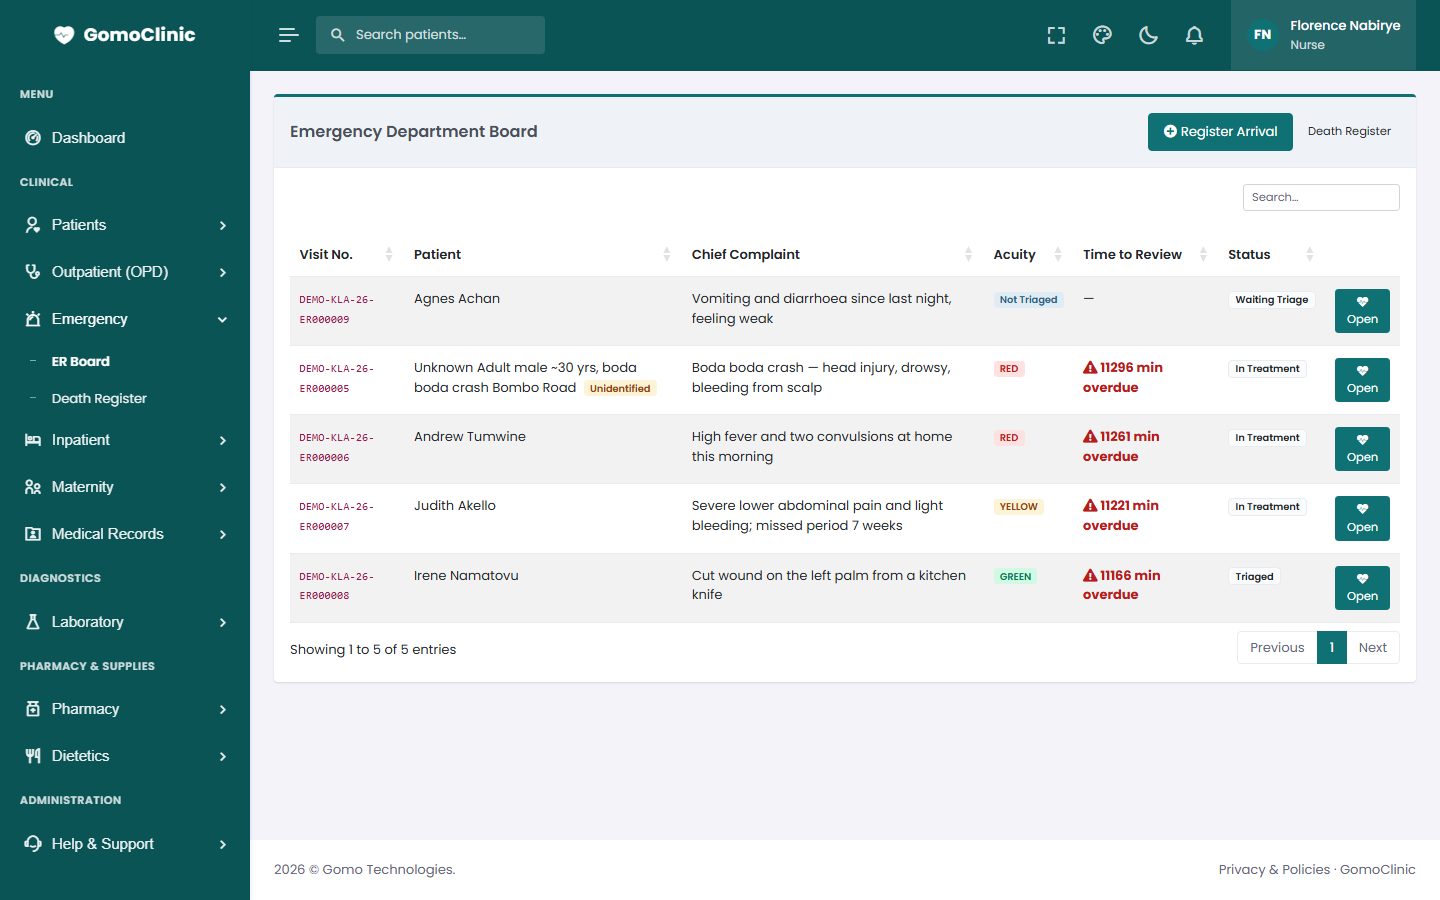
The emergency department works from the Emergency → ER Board. Patients arriving unknown can be registered quickly and completed later.
- Arrival. Register the patient (or a quick unknown-patient record) and open an ER attendance.
- Triage. Record vitals and the triage category. The board orders patients by urgency, so the most critical are seen first.
- Treatment. Orders, notes, procedures and medicines are recorded against the attendance.
- Outcome. Discharge home, admit to a ward (the admission is created from here), refer out, or record a death in the Death Register.
5Admissions, wards and nursing
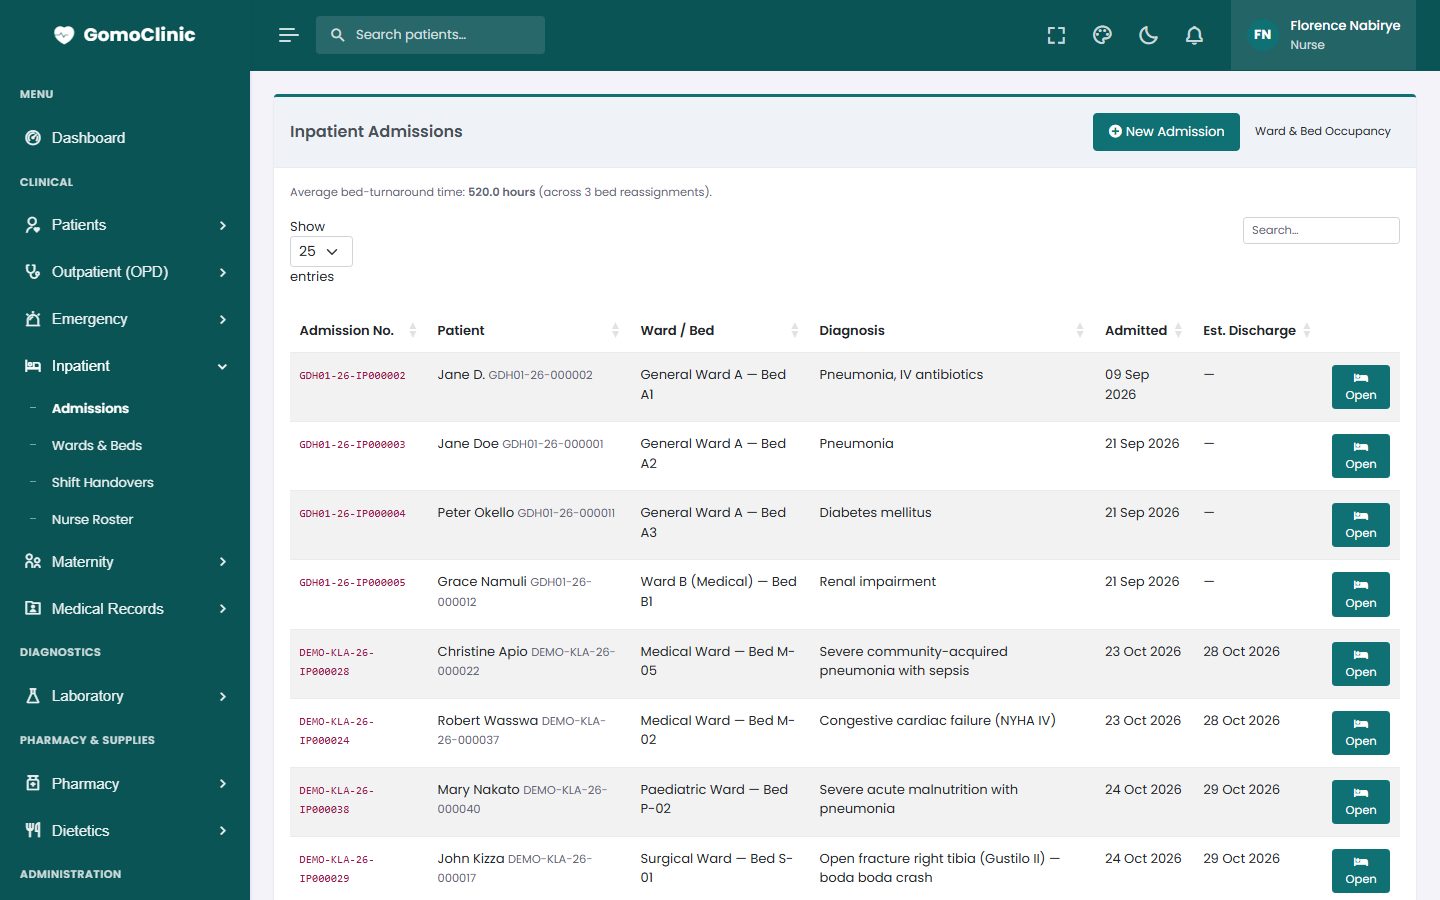
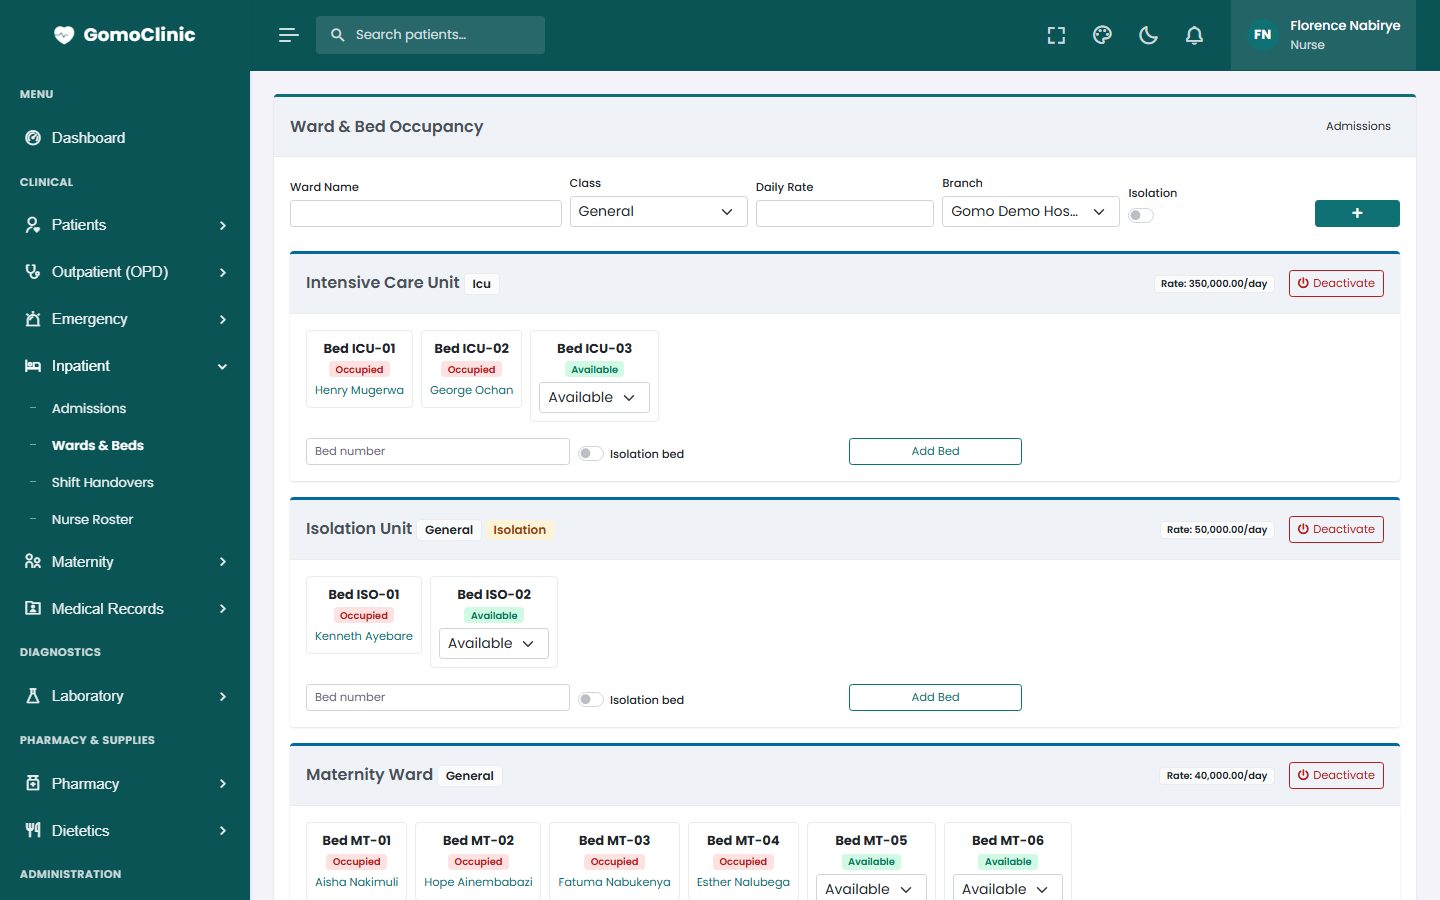
Patients who stay are admitted to a ward and bed. Nurses chart care, give medicines and hand over between shifts until discharge.
Admitting a patient
- Admit from the consultation, the emergency board, or Inpatient → Admissions.
- Choose the ward and a free bed, the admitting clinician and the reason.
- Bed-day charges are added to the bill automatically for each day of the stay.
Nursing care
- Medication administration record. Each dose is given and signed for on time. Missed and late doses stand out.
- Vitals and fluid charts. Readings outside safe ranges are flagged.
- Care plans and nursing notes, per shift.
- Shift Handovers: what the next shift needs to know, signed by both nurses.
- Nurse Roster: shifts and swap requests.
Transfer and discharge
Move a patient to another bed or ward from the admission page; the history moves with them. At discharge, write the discharge summary and medicines to take home. The final bill is ready for the cashier.
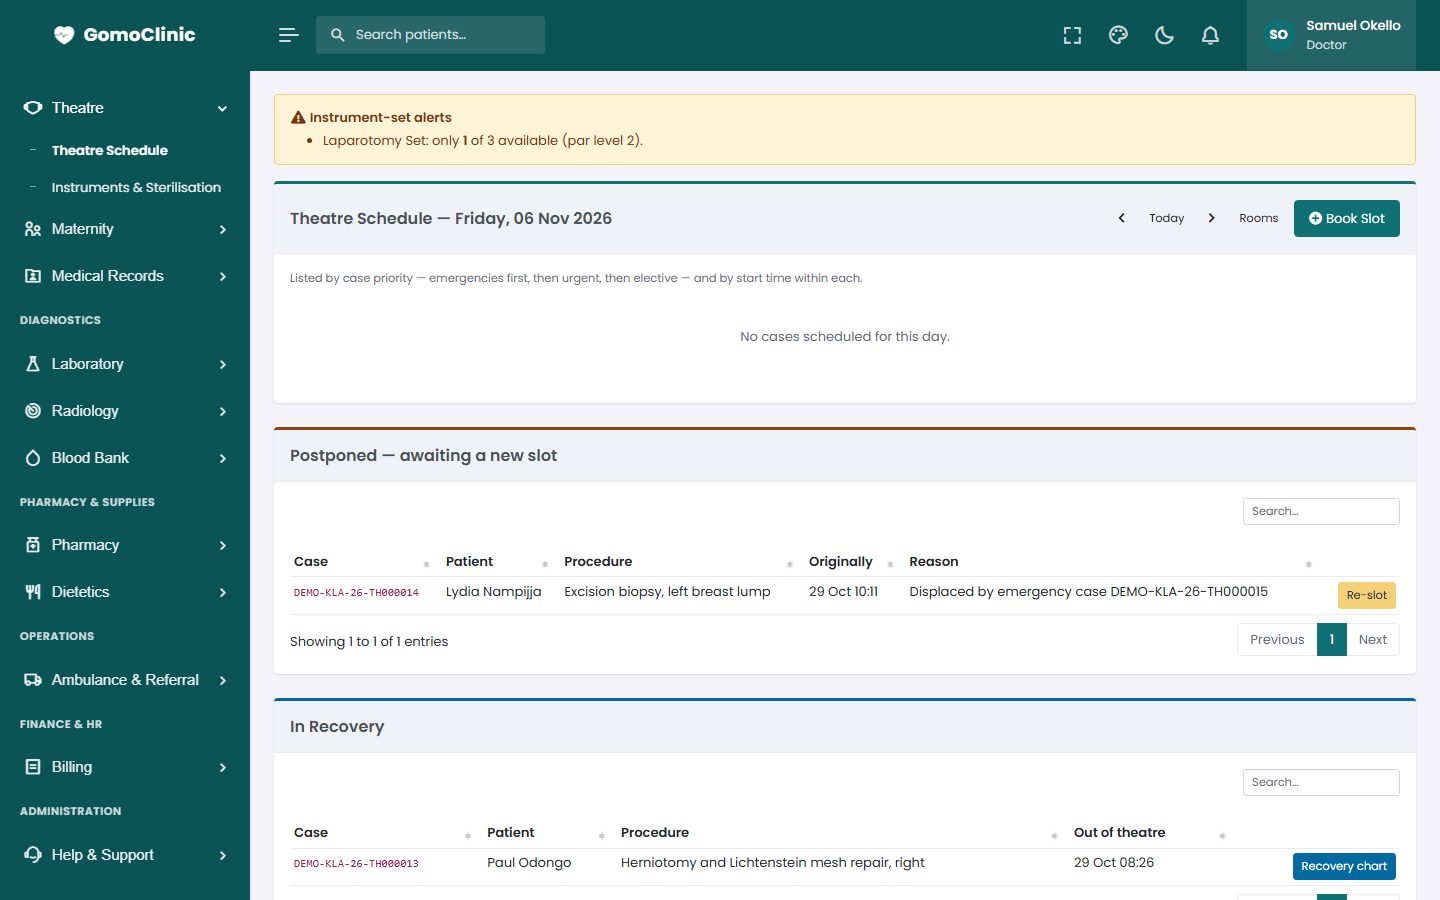
6Theatre
The theatre module takes an operation from booking to recovery.
- Book. Theatre → Theatre Schedule: choose the theatre room, date, time, surgeon and procedure. Room clashes are refused.
- Pre-operative checklist and consent. The patient cannot go in until the checklist is complete and consent is recorded.
- Intra-operative record and anaesthesia record: times, team, findings, monitoring, drugs given.
- Recovery: post-operative observations until the patient returns to the ward.
- Consumables and instruments: items used are charged, and instrument sets are tracked through sterilisation (Instruments & Sterilisation).
7Maternity: antenatal, labour, newborn and family planning
The maternity module follows a mother from her first antenatal visit through labour and delivery to postnatal care, and keeps a record for every baby.
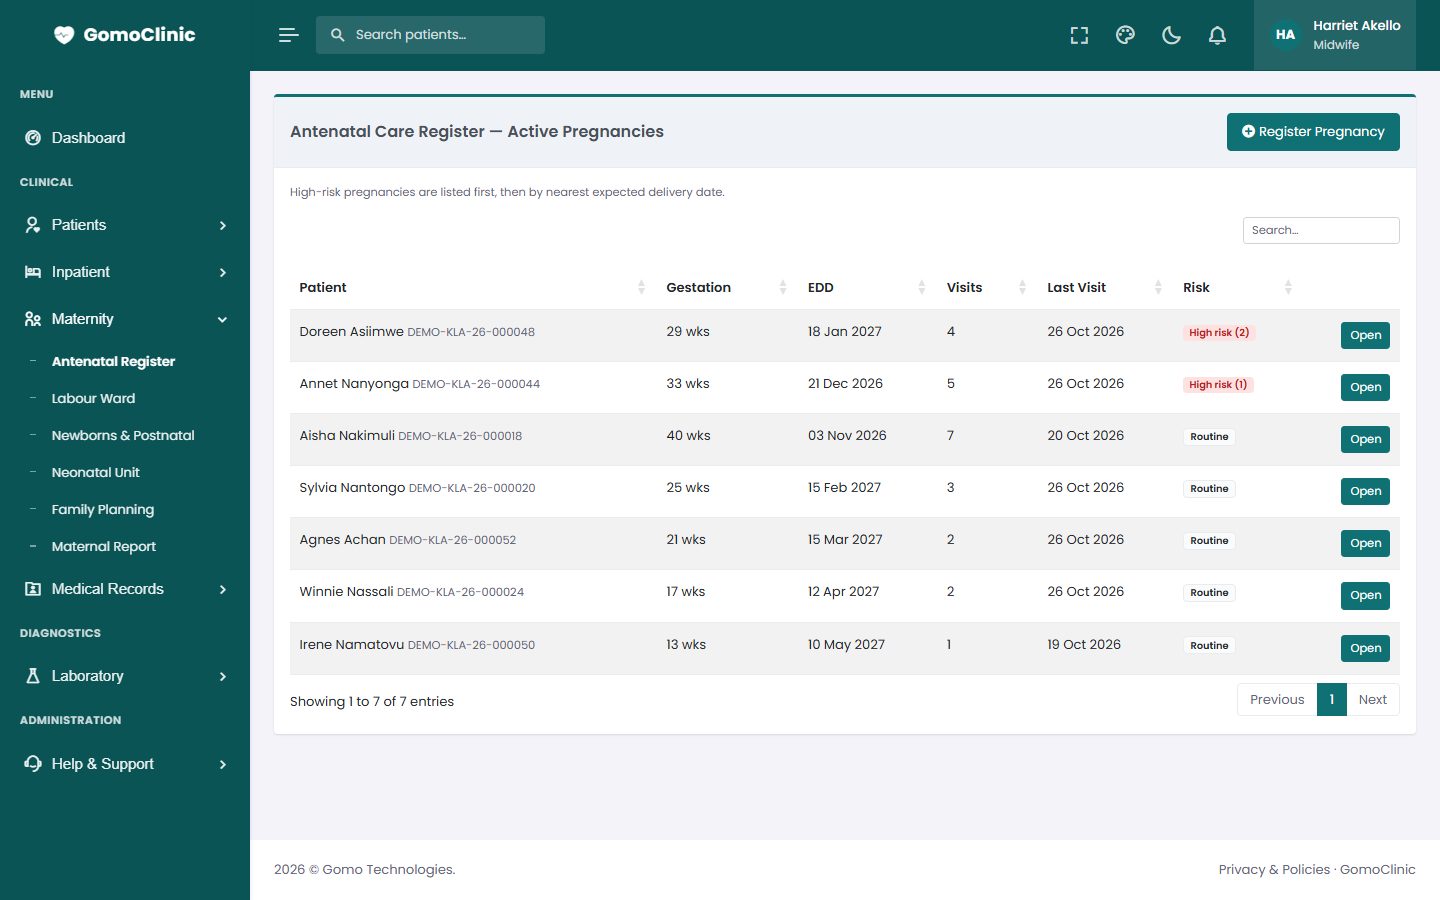
Antenatal care
- Open Maternity → Antenatal Register and register the pregnancy for the patient: last menstrual period (the expected delivery date and gestation are calculated), gravida and parity, and risk factors.
- At each visit record the observations, tests and advice. High-risk pregnancies are flagged on the register.
Labour and delivery
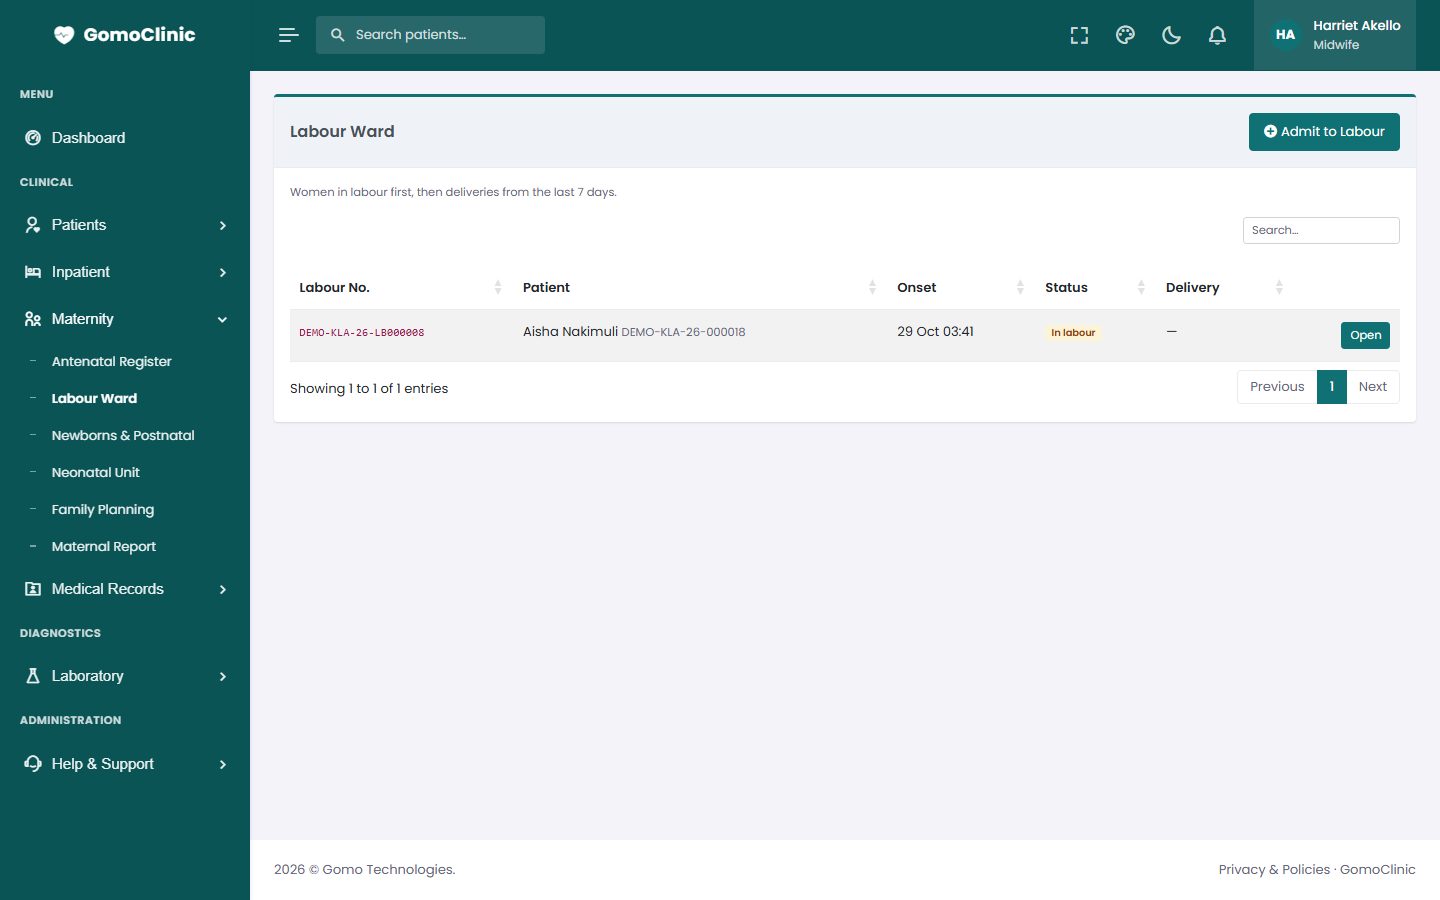
- On admission in labour, open the case in Maternity → Labour Ward.
- Chart the partograph as labour progresses: cervical dilatation, contractions, fetal heart rate, maternal vitals. Readings that cross the alert and action lines are highlighted.
- Record the delivery: time, mode, outcome, blood loss, and the baby (or babies), with APGAR scores.
Newborns, postnatal care and the neonatal unit
Each baby gets their own record, linked to the mother, under Newborns & Postnatal. Postnatal checks for mother and baby are recorded here. Babies who need special care are admitted to the Neonatal Unit, where observations and feeds are charted.
Family planning and reports
Record family planning clients, methods given and return dates in Family Planning. The Maternal Report totals deliveries, outcomes, complications and births for any period, ready for monthly reporting.
8Laboratory
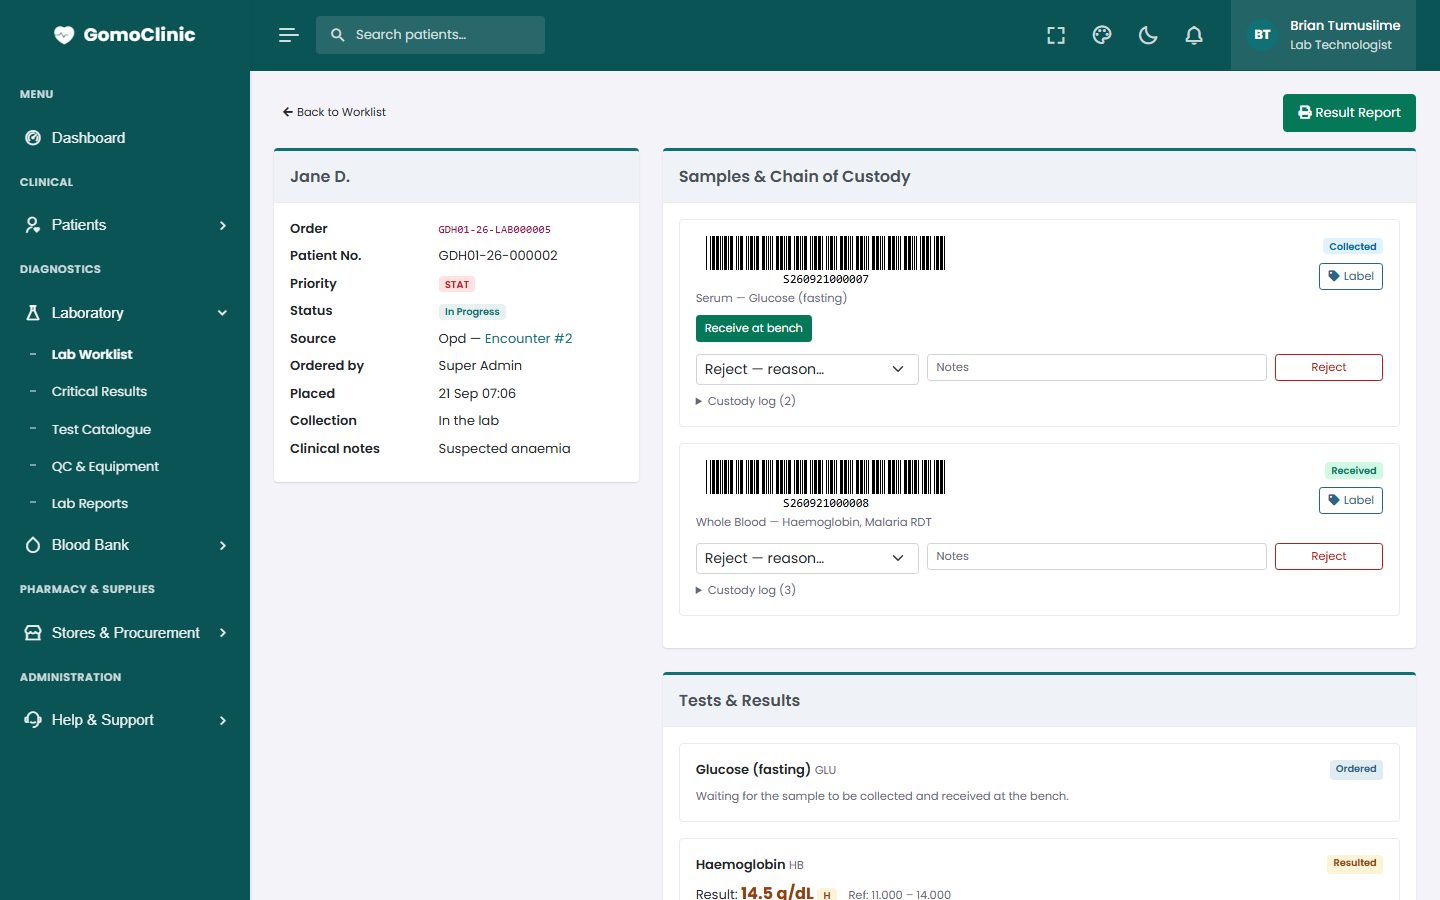
The laboratory module takes a test from the request to a verified, printed result: samples are labelled and tracked, results are checked against reference ranges, and critical values must be phoned through before release.
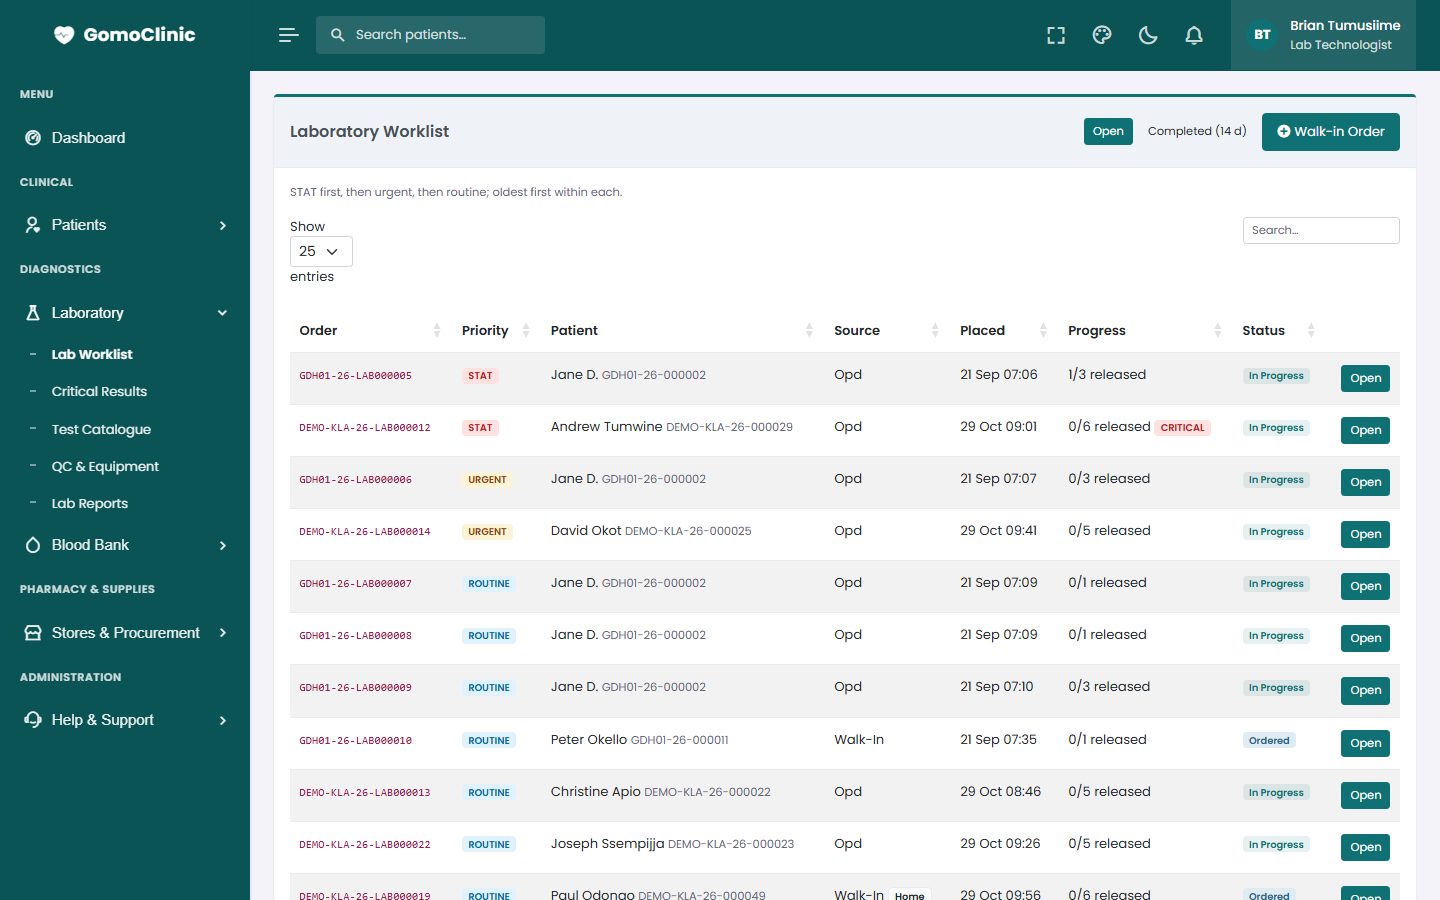
The worklist
Laboratory → Lab Worklist shows every order with its priority (STAT orders first), status and source (OPD, ward, emergency or walk-in).
Processing an order
- Collect and label. Open the order and print the barcode Label for each sample. Mark the sample received in the lab. Every step is kept in the sample's chain of custody.
- Reject if unsuitable (haemolysed, clotted, wrong tube…): choose the reason and click Reject. The requester is told and a new sample can be taken.
- Enter results. Each value is checked against the reference range for the patient's age and sex: high and low values are marked, and critical values are flagged in red.
- Verify. A second person verifies the results.
- Release. Click Release. The result appears to the requester at once.
Test catalogue, quality control and equipment
- Test Catalogue: tests and panels, sample types, reference ranges by age and sex, turnaround times and prices.
- QC & Equipment: daily control results (out-of-range runs are flagged) and analyser maintenance and calibration.
Reports
Lab Reports: workload, turnaround times, rejected samples and income by test, client or period, with export to Excel (CSV).
9Imaging and blood bank
Radiology
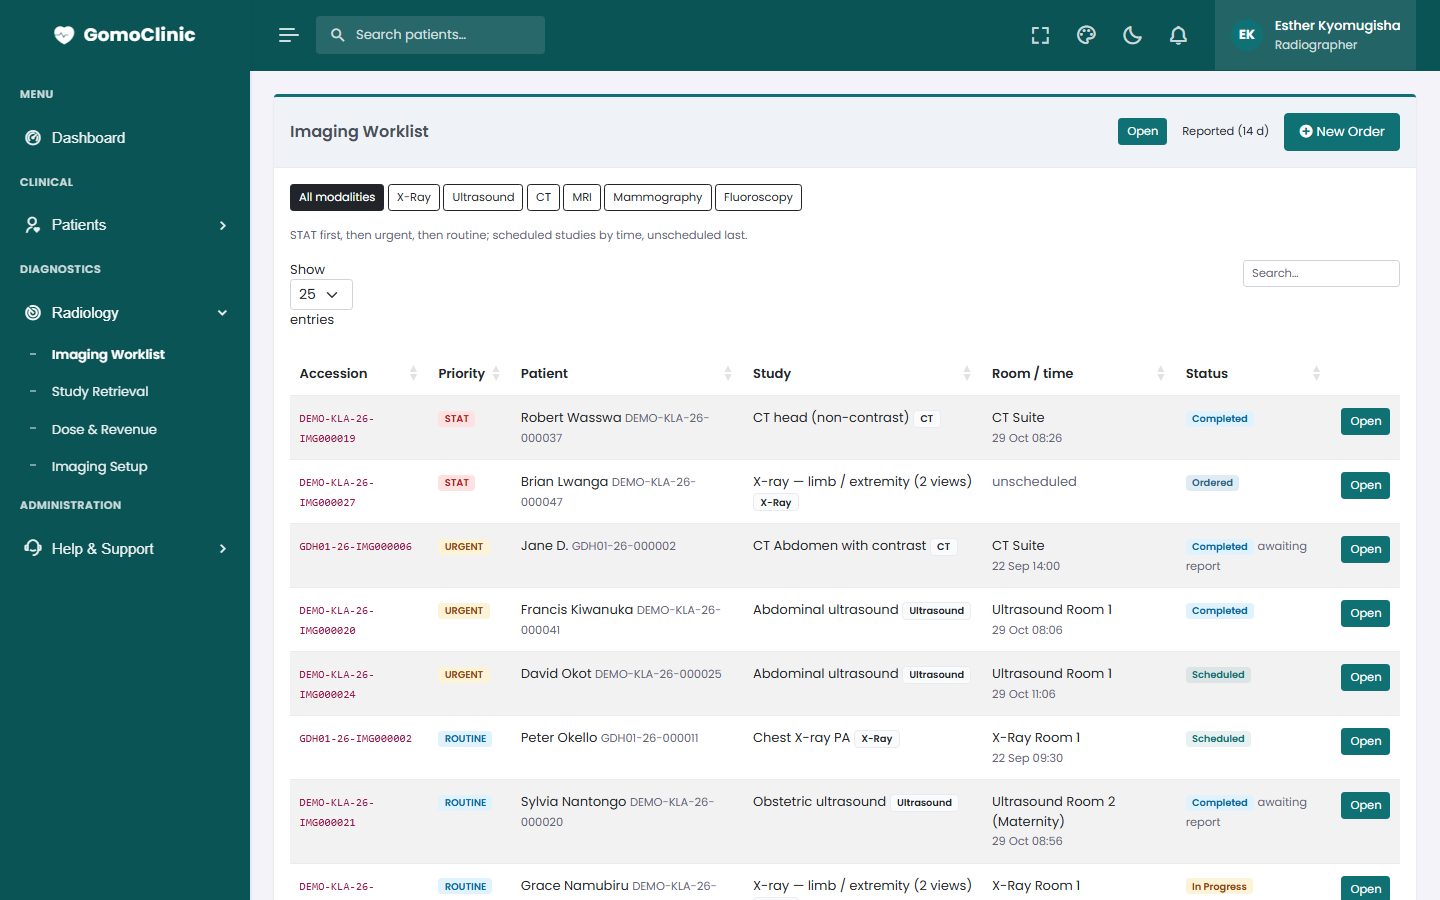
Imaging requests from clinicians arrive on the Radiology → Imaging Worklist. The radiographer performs the study and records contrast and radiation dose. Images are attached, and the radiologist writes and signs the report, which goes straight back to the requester. Contrast allergies and pregnancy are checked before the study.
Blood bank
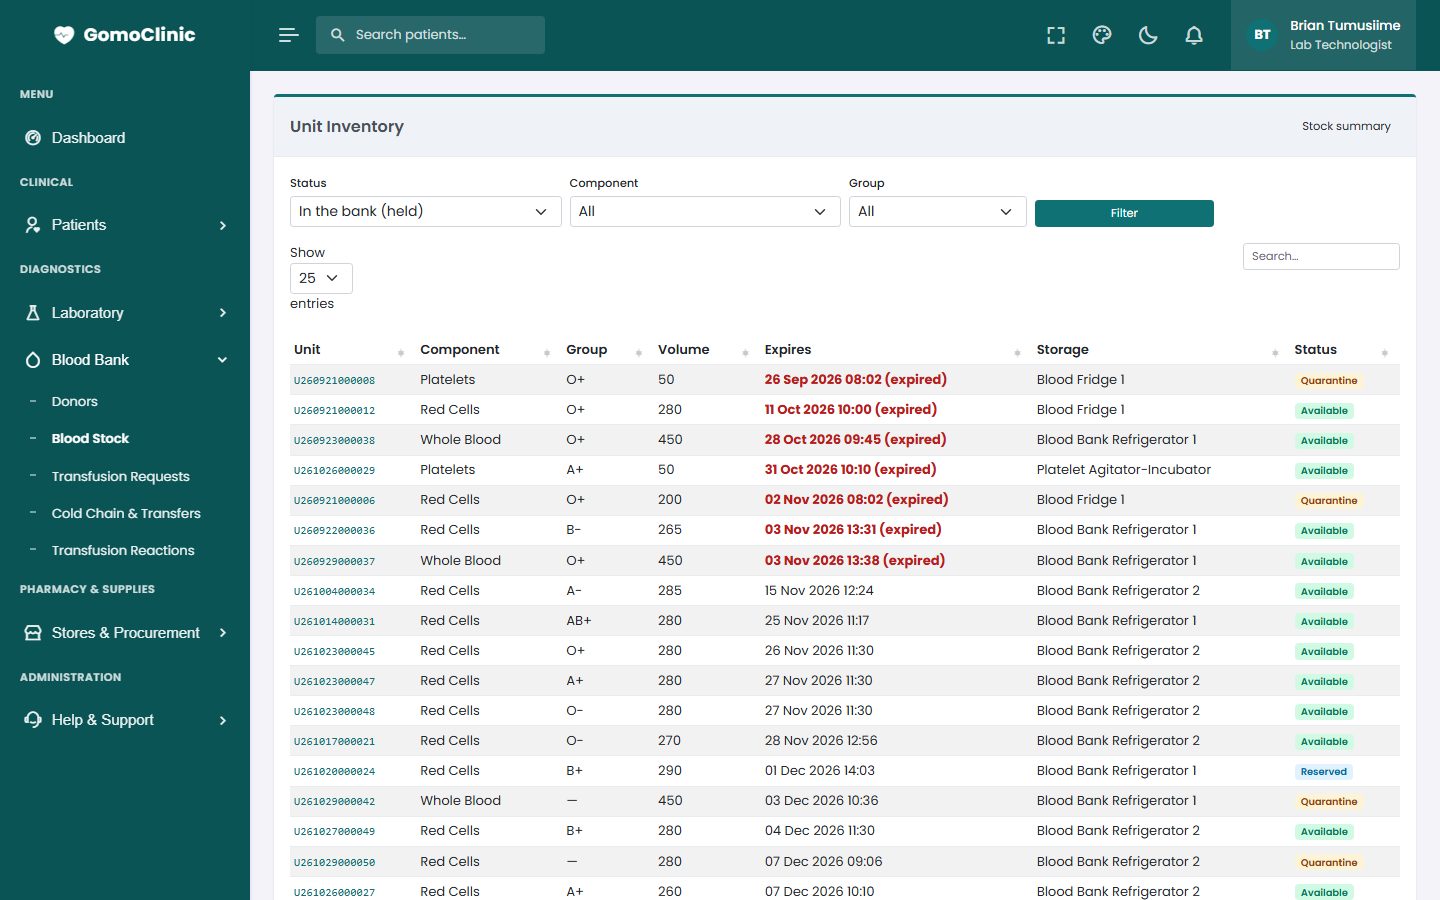
Register and screen donors, then collect, test, group and separate units. Blood Stock shows units by group and component with their expiry. Transfusion requests are cross-matched before issue, storage temperatures are logged, and any reaction is reported and investigated.
10Pharmacy: stock, dispensing and sales
The pharmacy module keeps the formulary, stock by batch and expiry, dispensing of prescriptions, counter sales, the controlled-drug register, purchasing and, for more than one outlet, transfers between them.
Selling at the counter (point of sale)
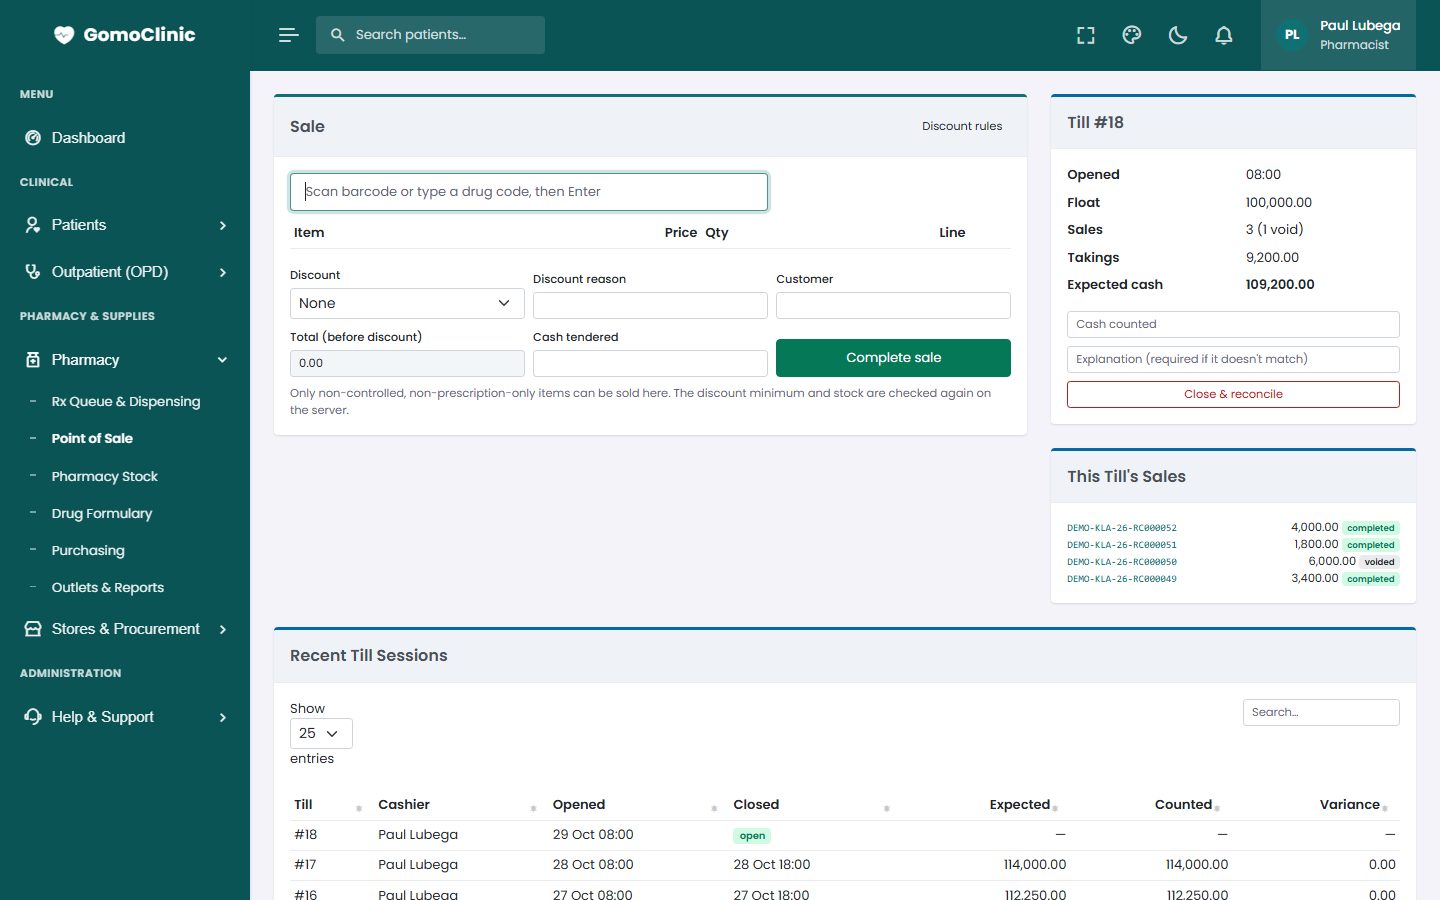
- Open Pharmacy → Point of Sale. At the start of the day, open your till with the cash float.
- Scan the barcode or type the drug code and press Enter. Change the quantity if needed. The price comes from the drug list (and the outlet's own price, if it has one).
- Apply a discount if one applies (with a reason), enter the cash tendered, and click Complete sale. The receipt is numbered and stock is taken from the batch that expires first.
- At the end of the day, count the cash, enter Cash counted and click Close & reconcile. If it doesn't match the expected cash, an explanation is required.
Dispensing prescriptions
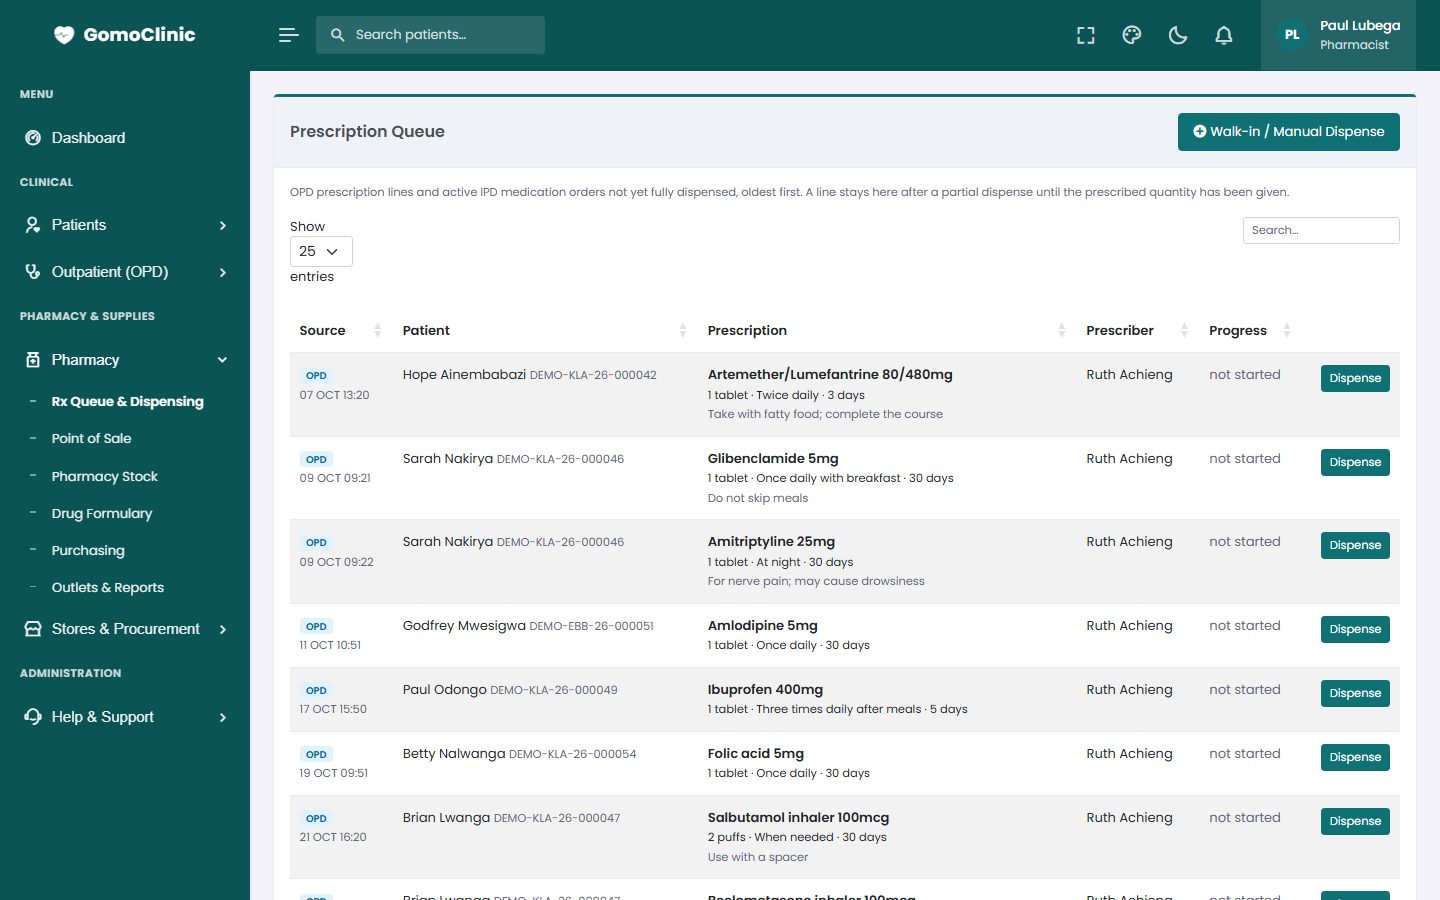
Prescriptions written by clinicians appear in Pharmacy → Rx Queue & Dispensing. Open one, check it (allergies and drug interactions are flagged), pick the batches, and dispense in full or in part. Partly dispensed items stay in the queue until completed.
The drug list (formulary)
Pharmacy → Drug Formulary holds every product: generic and brand name, form and strength, code and barcode, price, reorder level, and whether it is prescription-only or controlled. To add a new product, fill in the form at the top of the page and click +. Add it before you receive it for the first time.
Stock, batches and expiry
Pharmacy → Pharmacy Stock shows each drug's quantity on hand, how much is sellable (in date), expired stock, reorder level and value. Click Batches to see each batch with its expiry. Drugs expiring within 90 days are listed at the top, so you can sell or return them in time. Quantities below the reorder level are shown in red.
Write-offs
Expired, damaged or lost stock is removed with a write-off (Write-offs): choose the batch, quantity and reason. A second person approves it, and a controlled drug also needs a witness.
Buying from suppliers
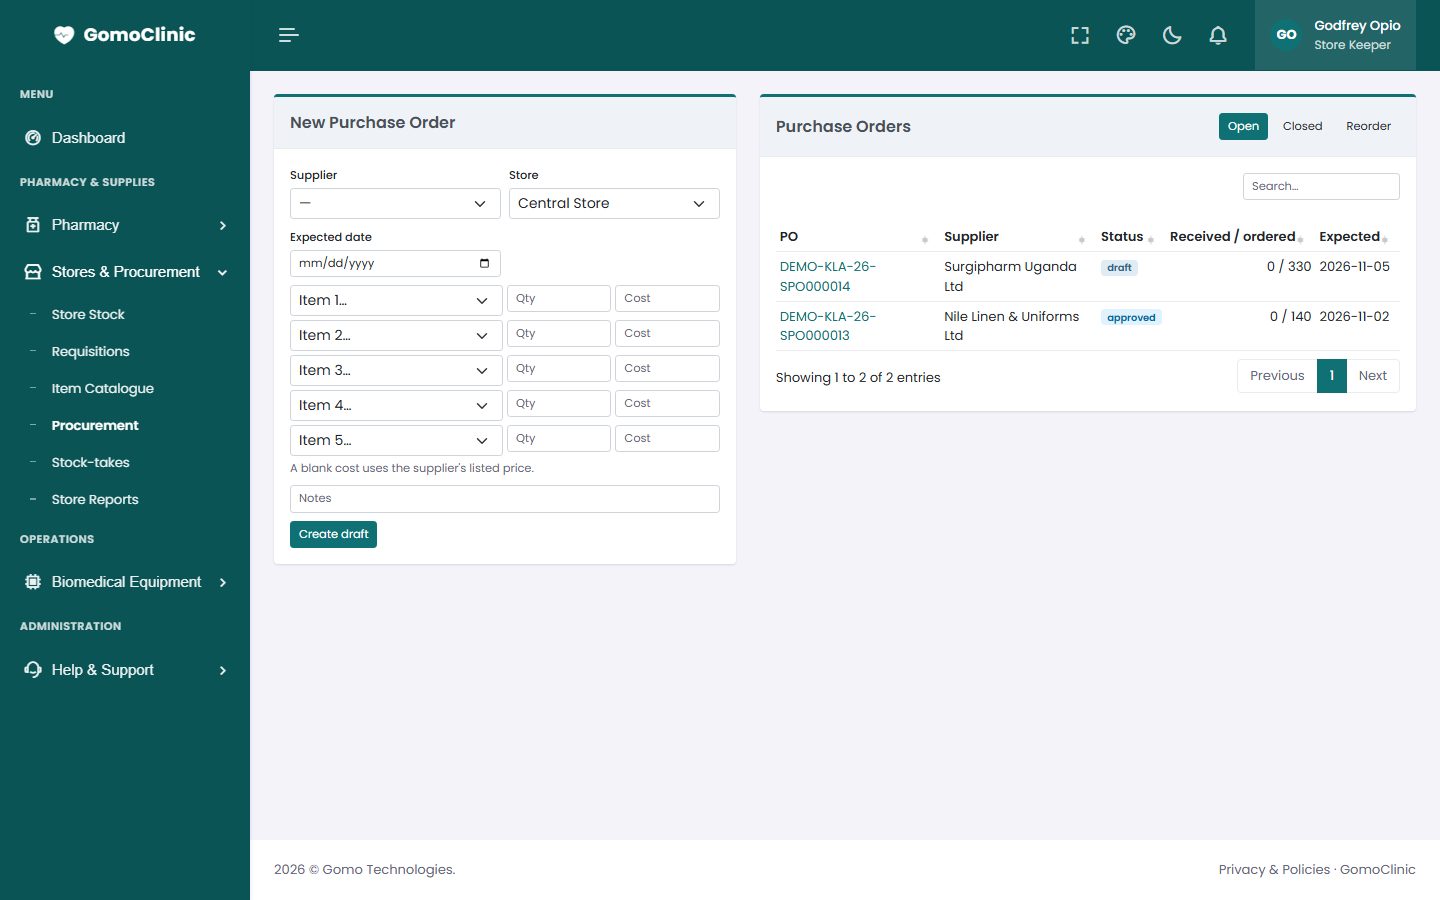
- Pharmacy → Purchasing suggests what to reorder from the reorder levels and recent sales.
- Create a purchase order to a supplier. Each supplier's latest prices are remembered.
- When the goods arrive, receive them against the order: enter the batch number, expiry date, quantity and cost for each line. Stock goes up straight away.
Reports
Stock reports show stock value, slow movers, expiry and consumption for any period.
11Billing and payments
Services are charged automatically as they are given: consultations, tests, drugs, bed-days and theatre. The cashier receives payment against the patient's bill, by cash, mobile money, card, bank or insurance.
The price list
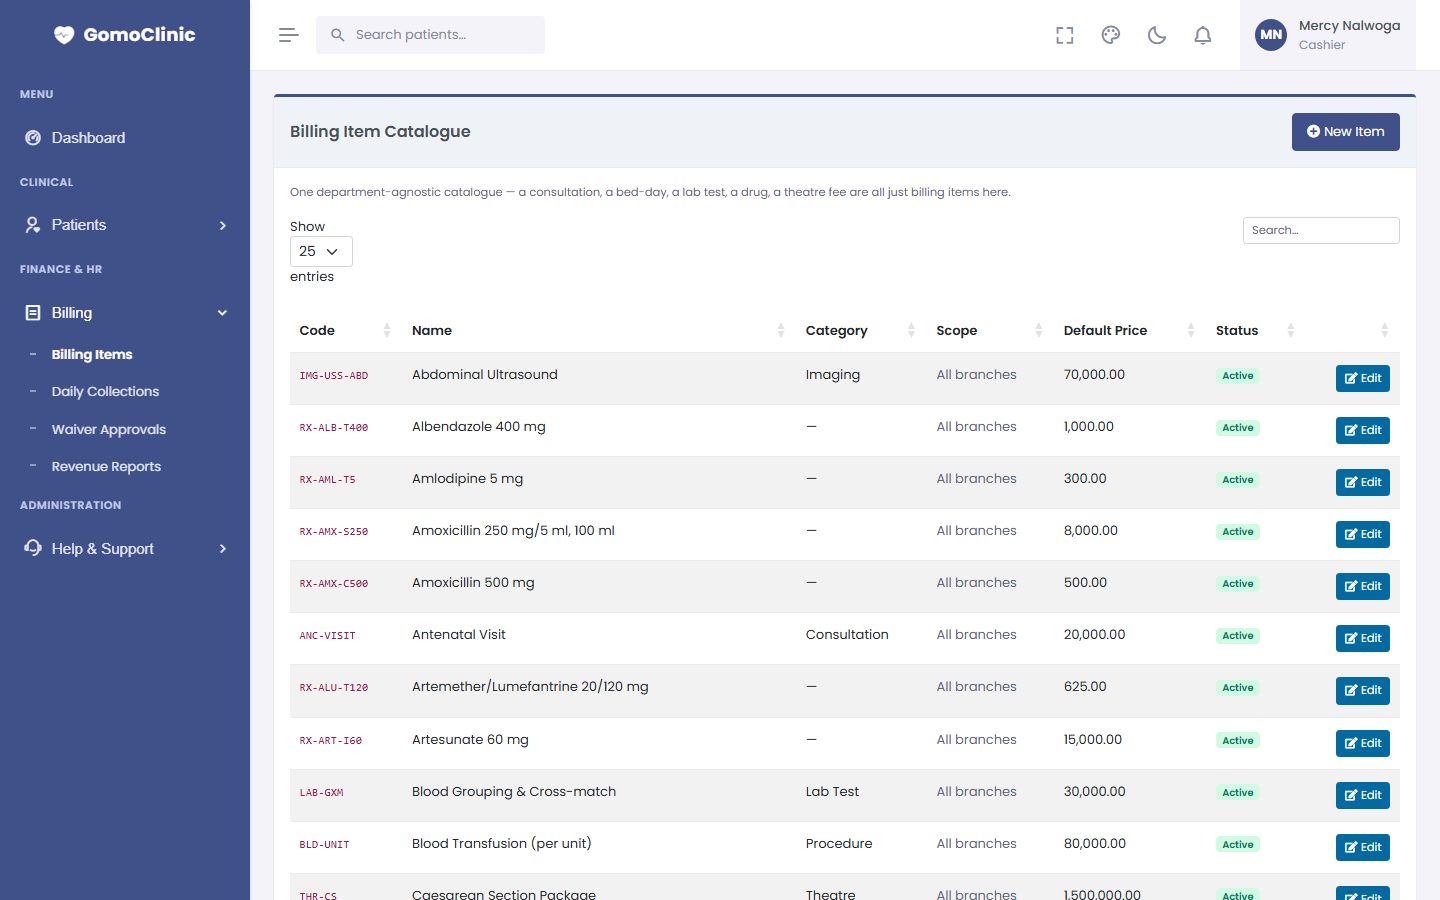
Billing → Billing Items: every chargeable service with its price. Insurance schemes and corporate clients can have their own tariffs (Schemes & Tariffs).
Receiving payment
- Open the patient's bill from their record or the cashier screen.
- Choose what is being paid, the method (cash, mobile money, card, bank) and the reference for non-cash payments.
- Save to issue a numbered receipt. Corrections are made by voiding or refunding with a reason, never by deleting.
Daily collections
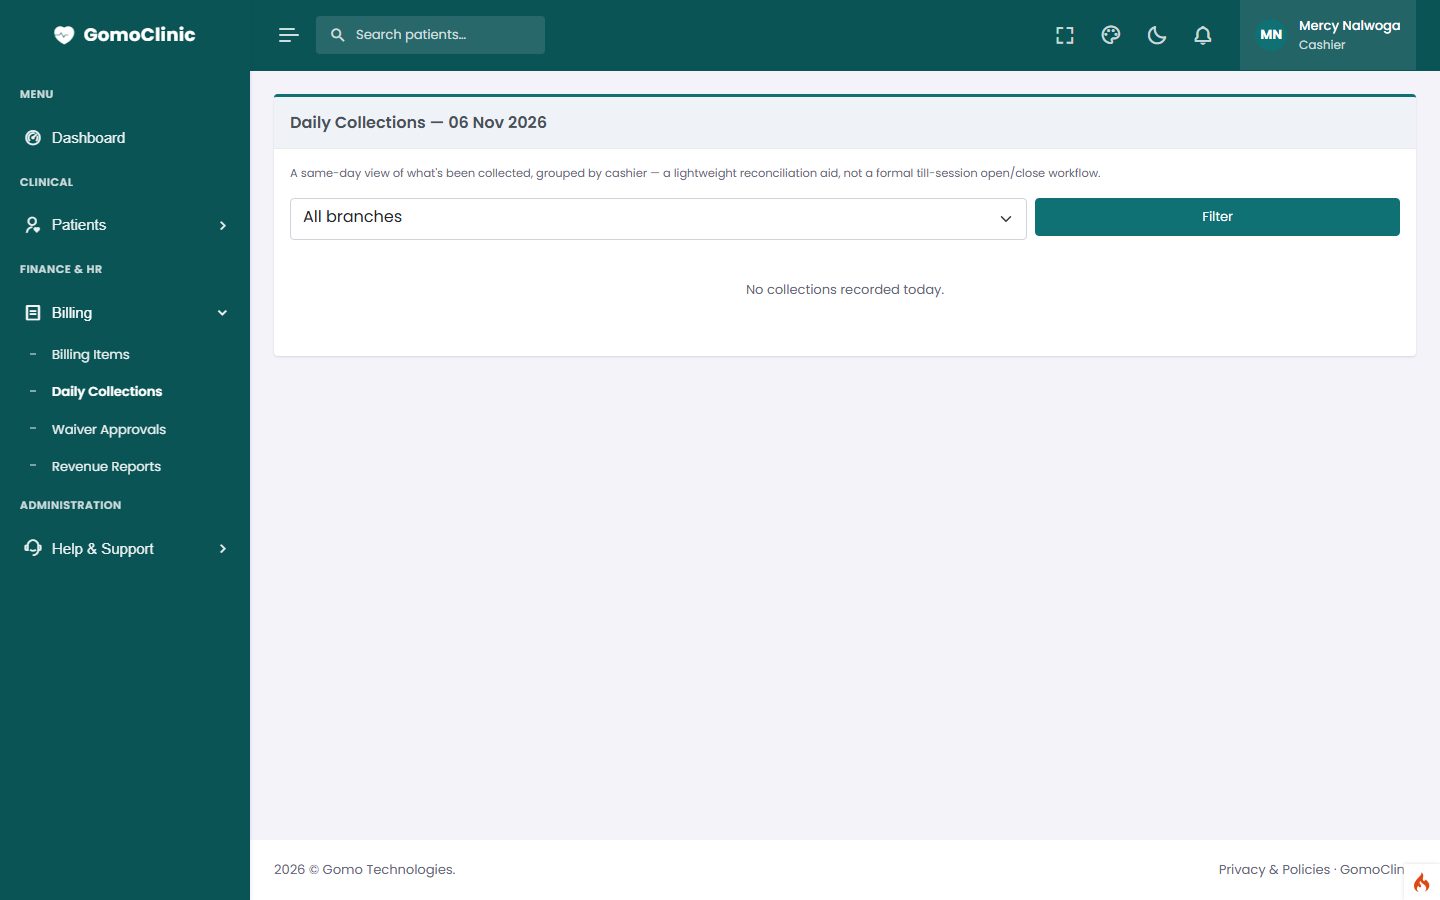
Billing → Daily Collections totals the day's receipts by cashier and payment method, ready for banking and end-of-day sign-off.
Insurance and waivers
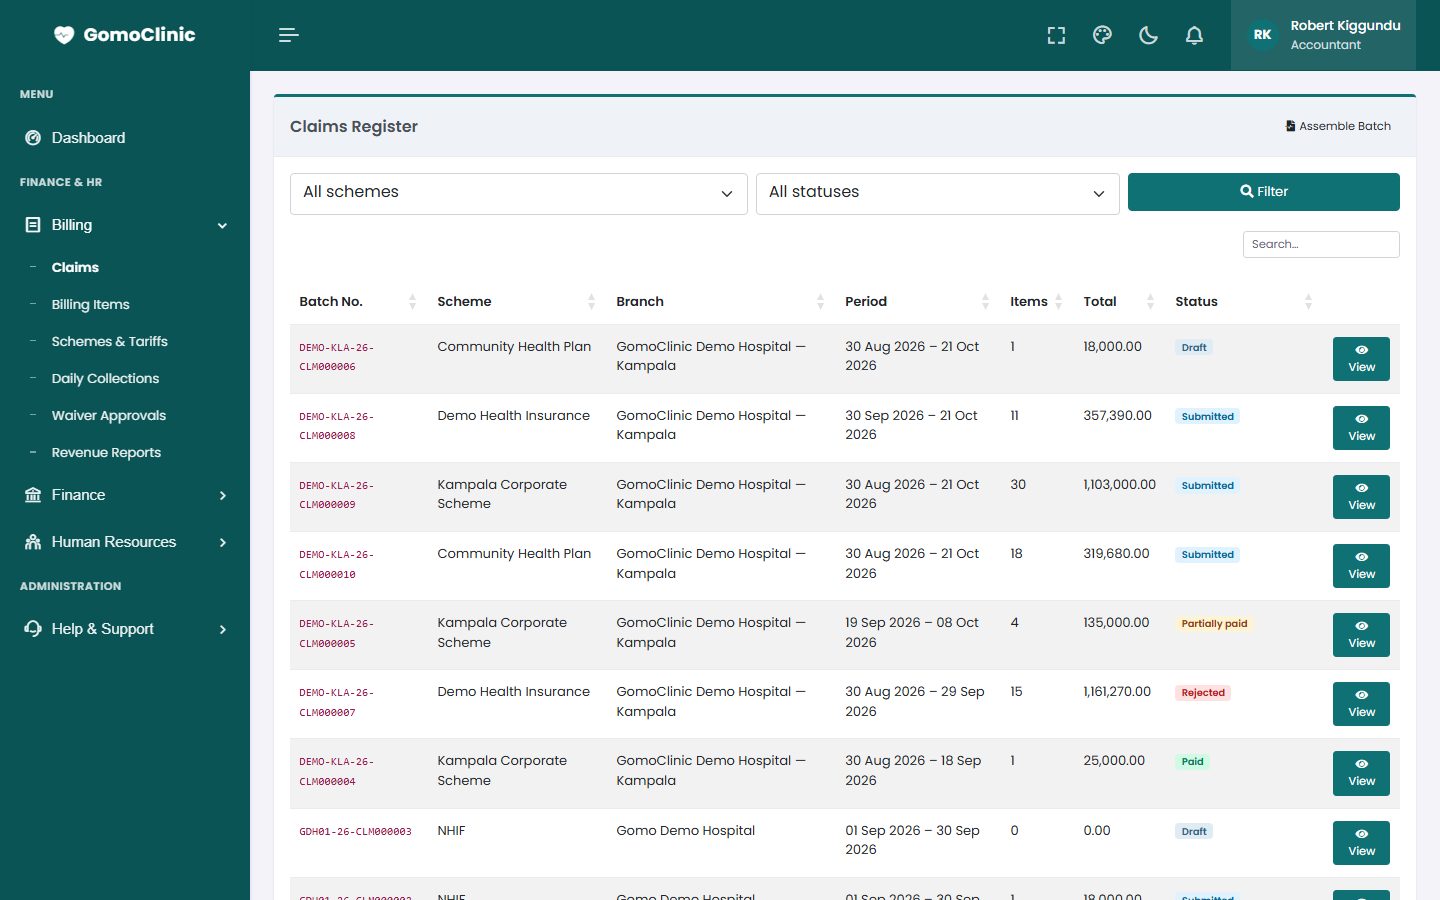
- Claims: charges for scheme members are batched into claims and tracked until paid.
- Waiver Approvals: discounts, waivers and write-offs need a reason and an approver.
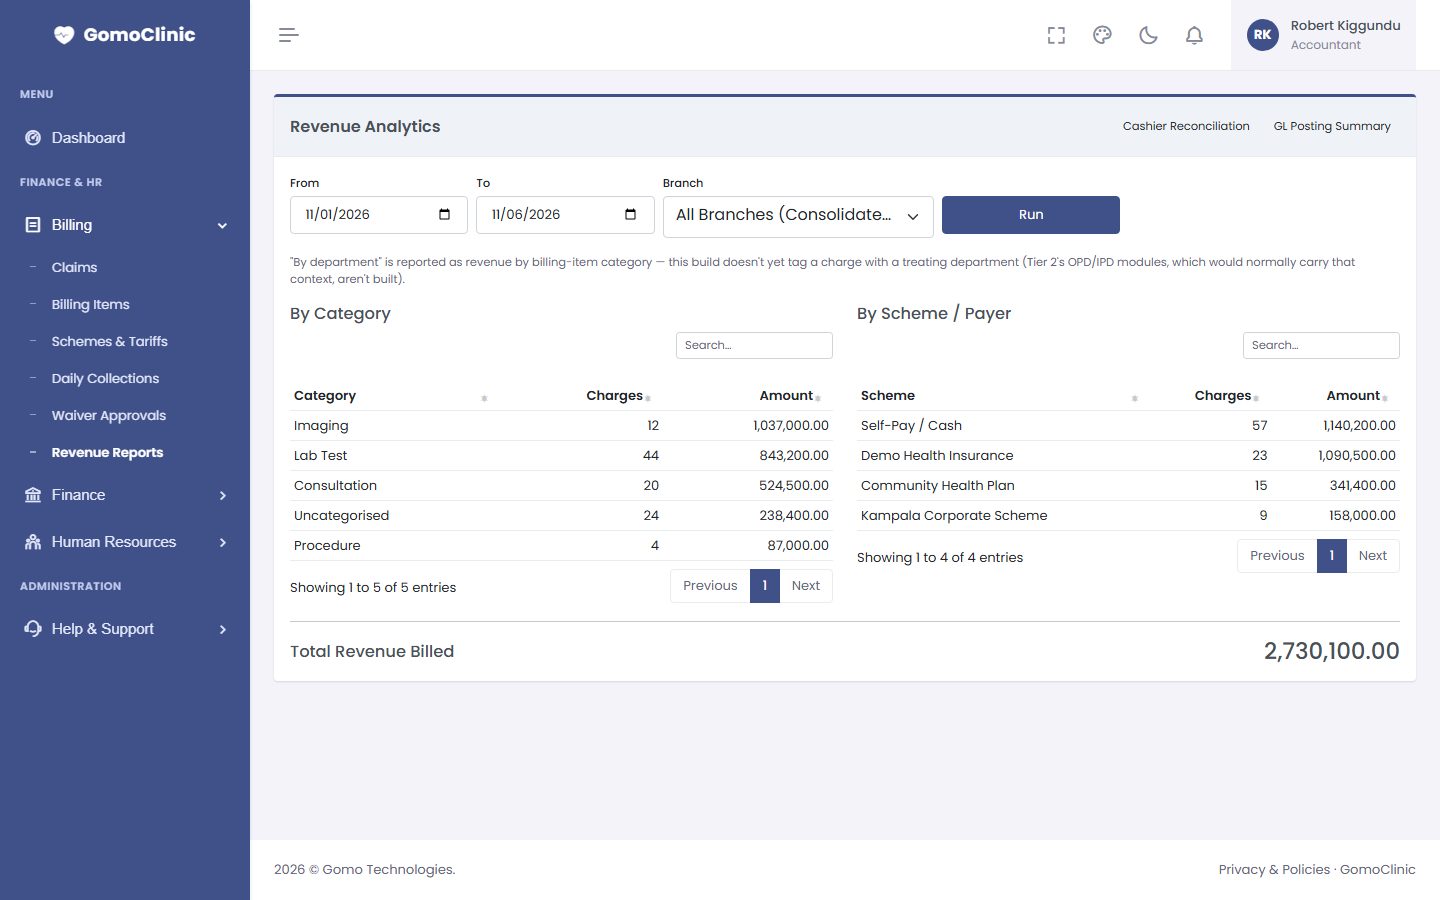
- Revenue Reports: income by department, service, scheme and period, and the cashier reconciliation.
12Stores and purchasing
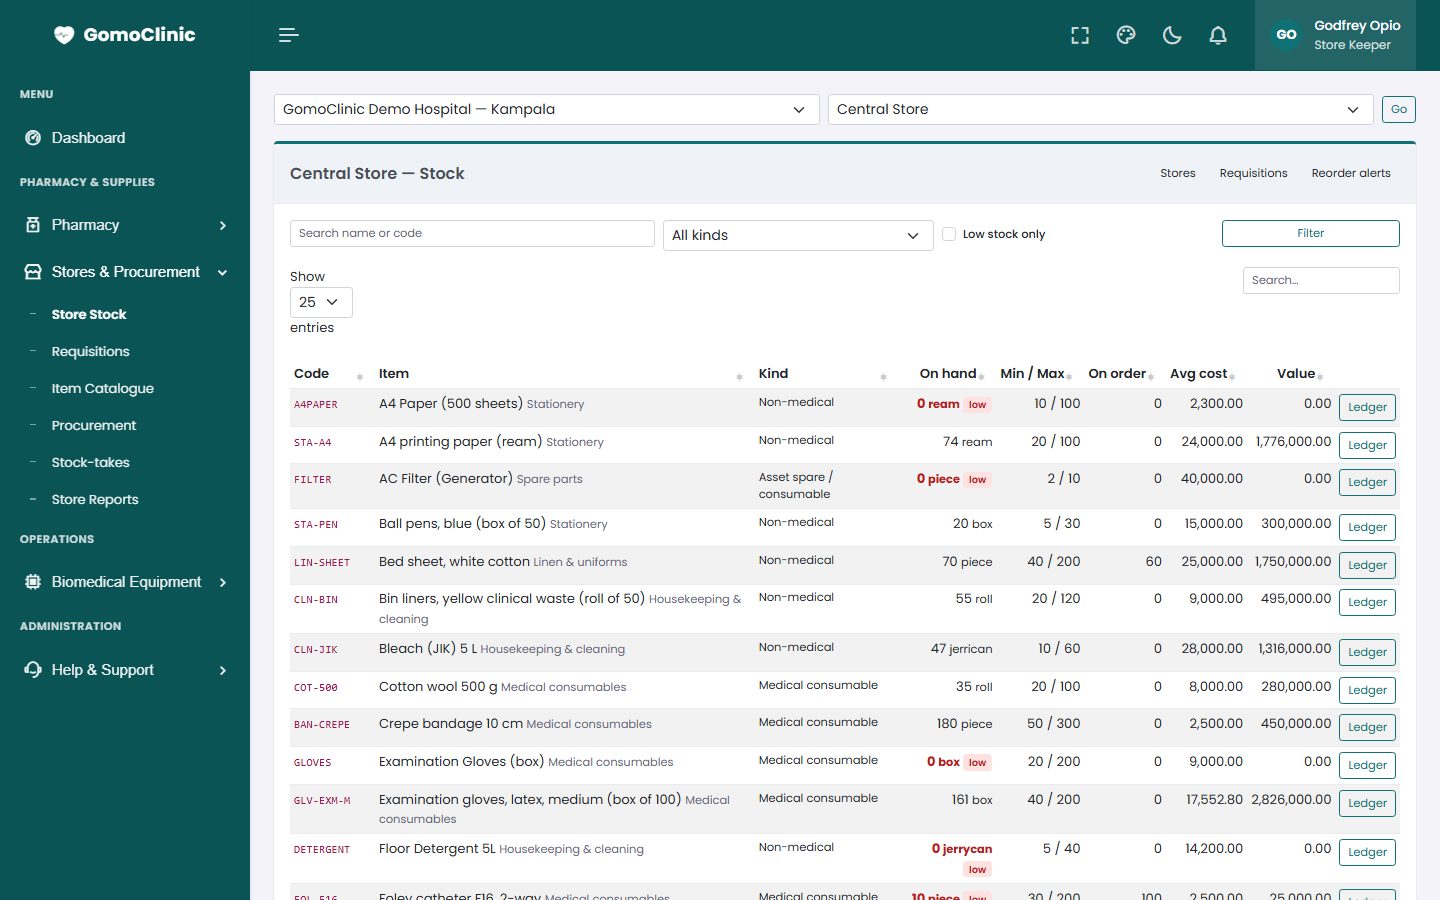
The stores module manages non-drug supplies: consumables, stationery, cleaning materials and sundries. A central store issues to departments against requisitions, and procurement buys from suppliers.
- Item catalogue. Stores & Procurement → Item Catalogue: each item with its unit, category and reorder level.
- Requisitions. A department requests items; the store keeper approves and issues them, in full or in part. Stock and its value go down at the store and the cost is recorded against the department.
- Procurement. Request quotations, compare them, raise a purchase order and receive the goods. Supplier delivery performance is tracked.
- Stock-takes. Count the shelves, enter the counts, and approve the variances.
- Reports. Stock valuation, reorder list, consumption by department and slow-moving items.
13Staff, payroll and finance
Human resources and payroll
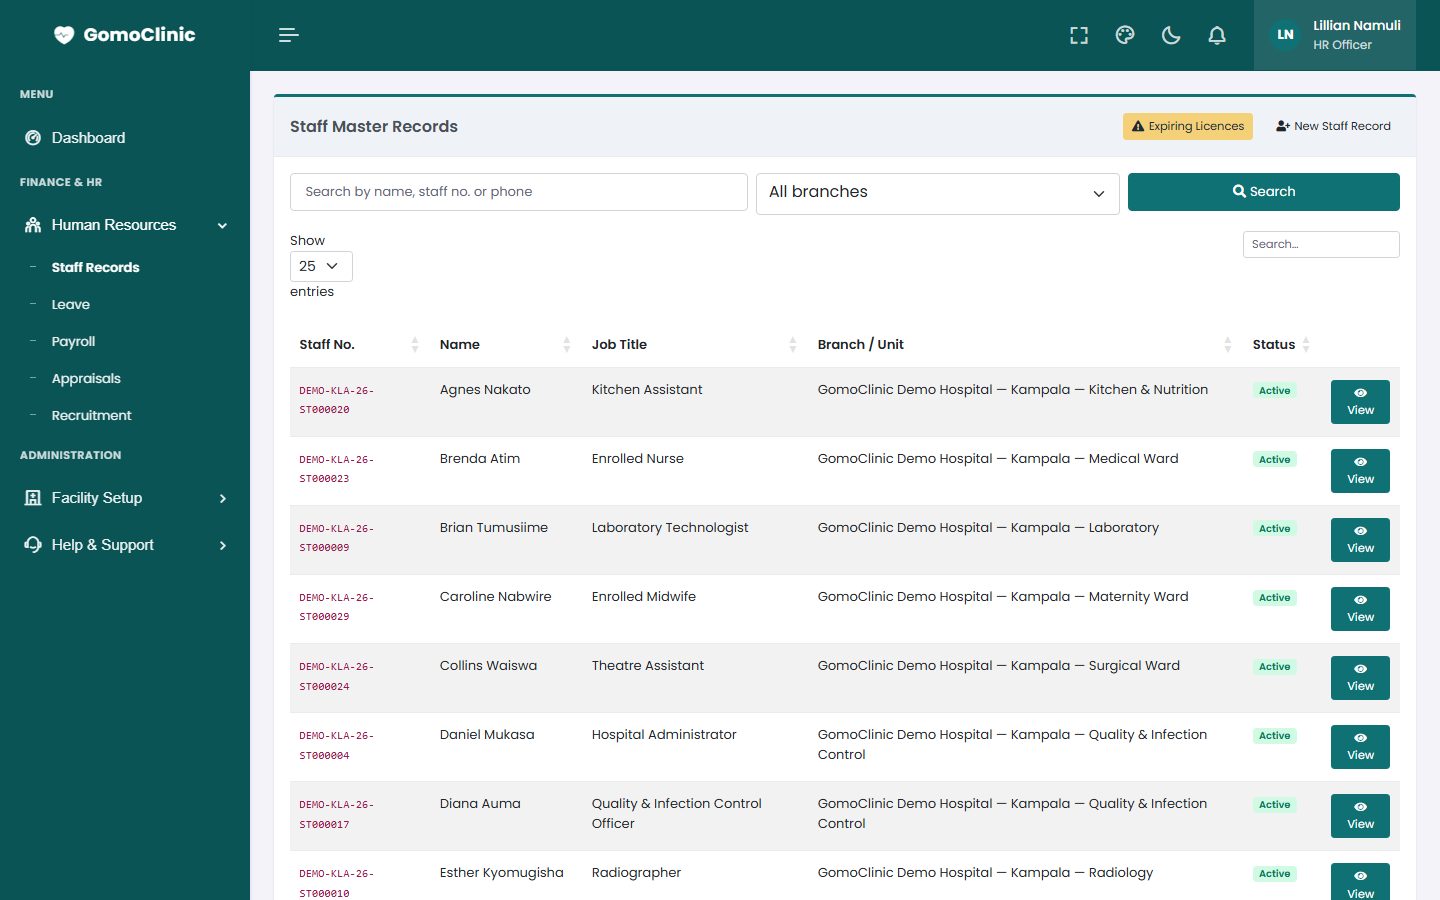
- Human Resources → Staff Records: every employee's details, contract, professional licence (with expiry reminders) and documents. A staff record is separate from a sign-in account: cooks or drivers can be on payroll without signing in.
- Leave: requests, approvals and balances.
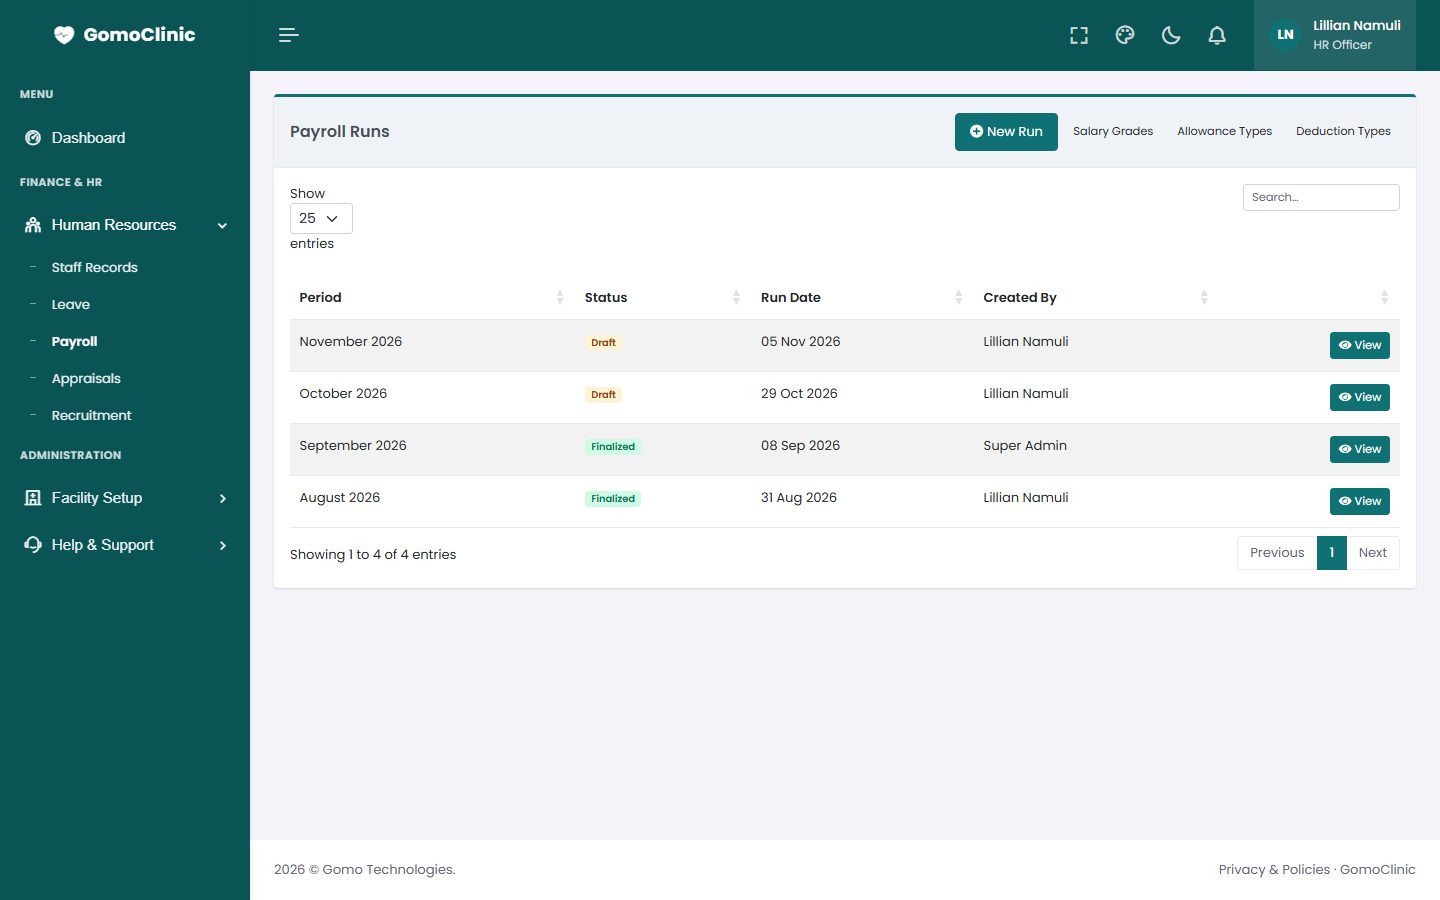
- Payroll: salary grades, allowances and deductions; run the monthly payroll and print payslips. PAYE and NSSF are calculated.
- Appraisals and Recruitment: appraisal cycles, vacancies and applicants.
Finance and accounting
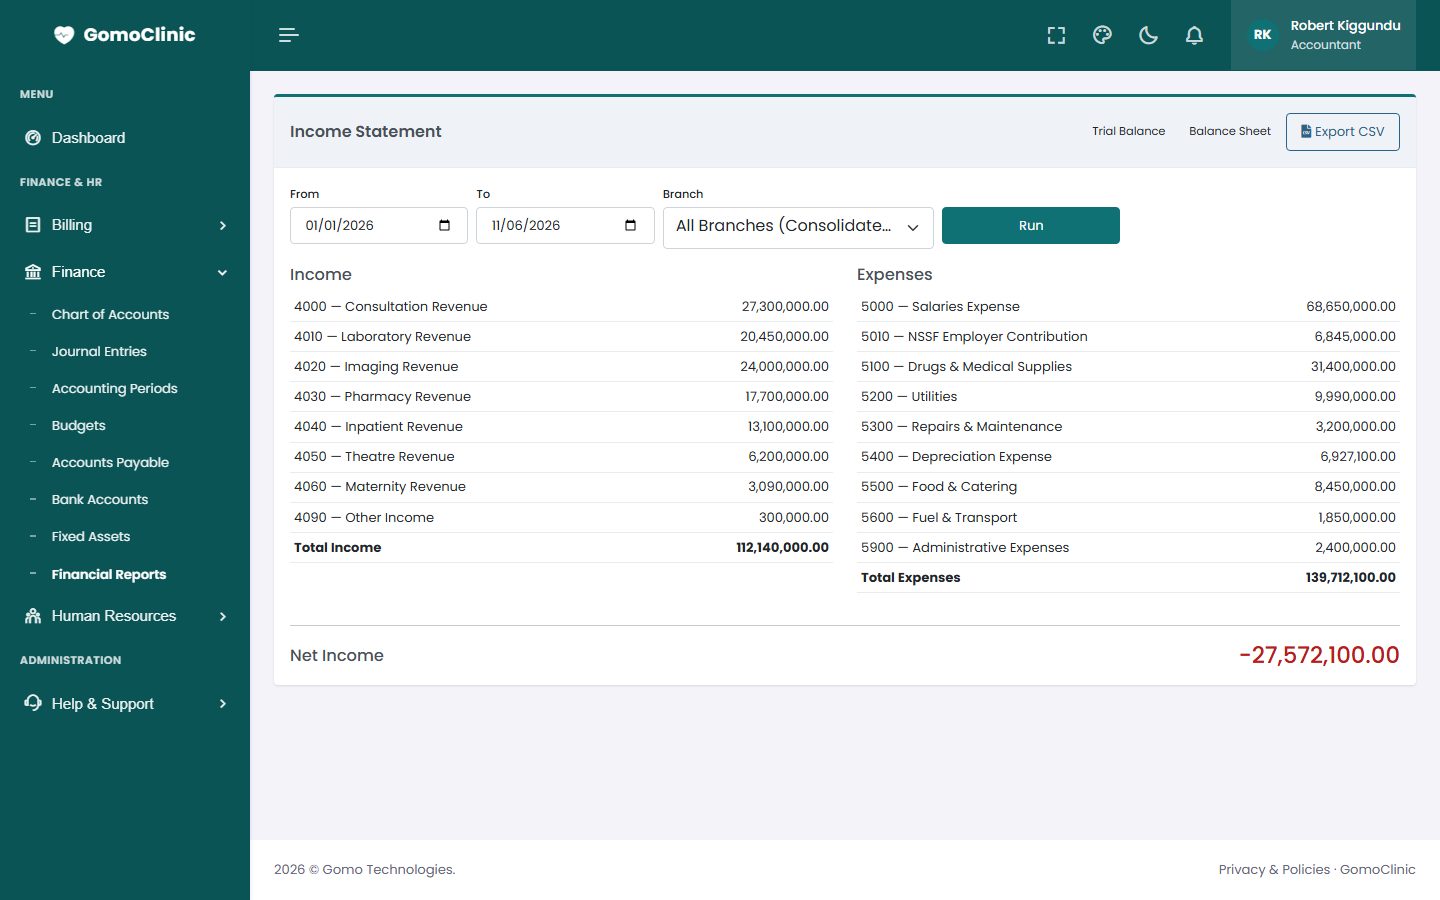
Receipts, supplier invoices and payroll post to the general ledger. Finance covers the chart of accounts, journal entries, accounting periods, budgets, accounts payable, bank reconciliation, fixed assets, and the trial balance, income statement and balance sheet, all exportable.
14Quality, equipment and ambulance
Quality and patient safety
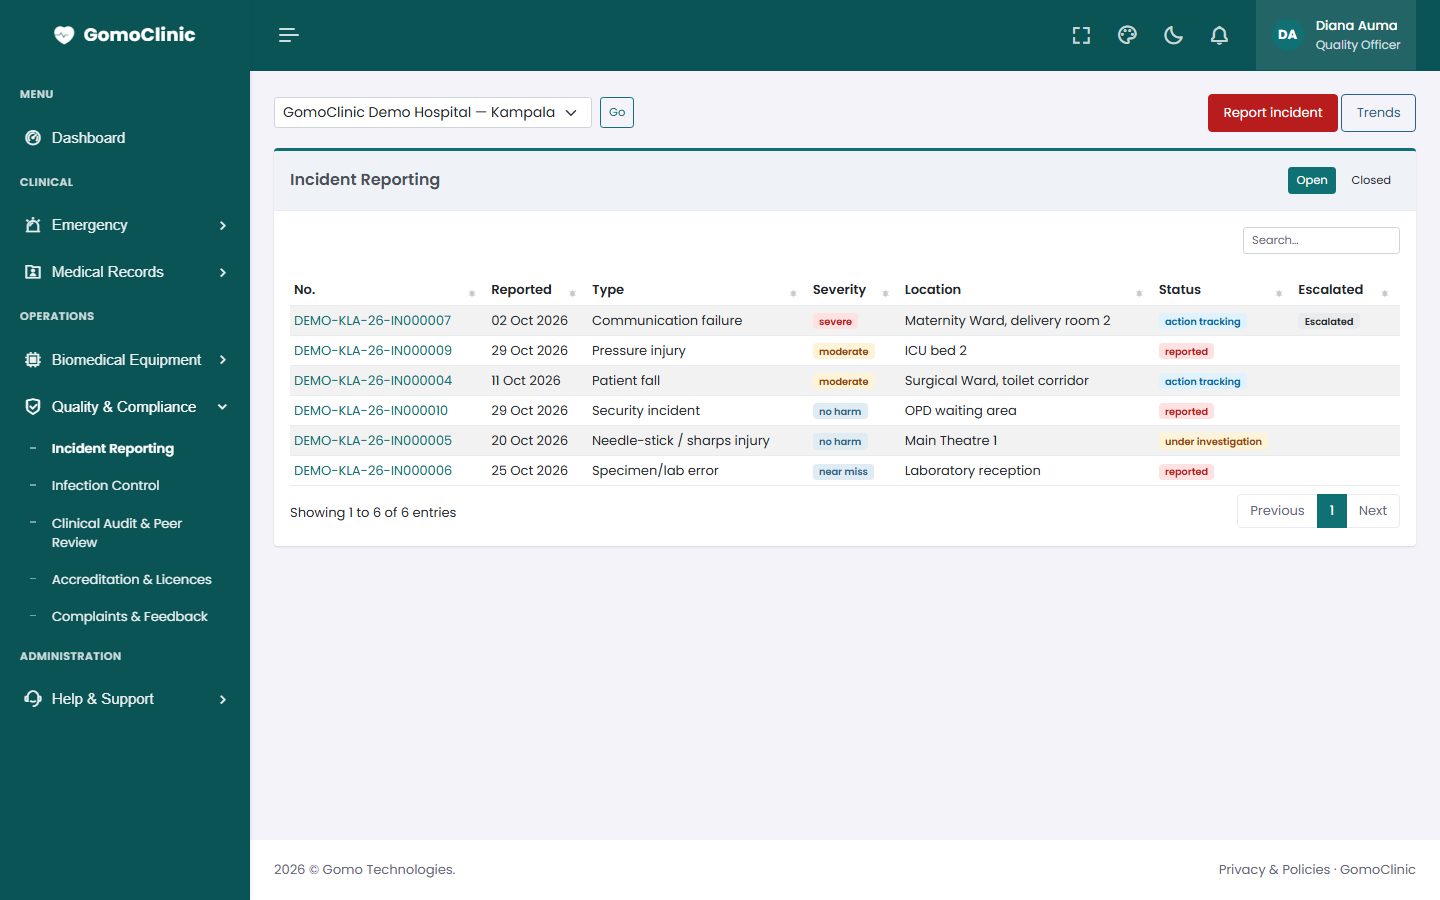
Any staff member can report an incident or near miss at Quality & Compliance → Incident Reporting. Severe harm is escalated automatically; an investigator is assigned and corrective actions are tracked to closure. The same area covers infection control (with outbreak alerts), clinical audit and peer review, licences and accreditation, and complaints from patients.
Biomedical equipment
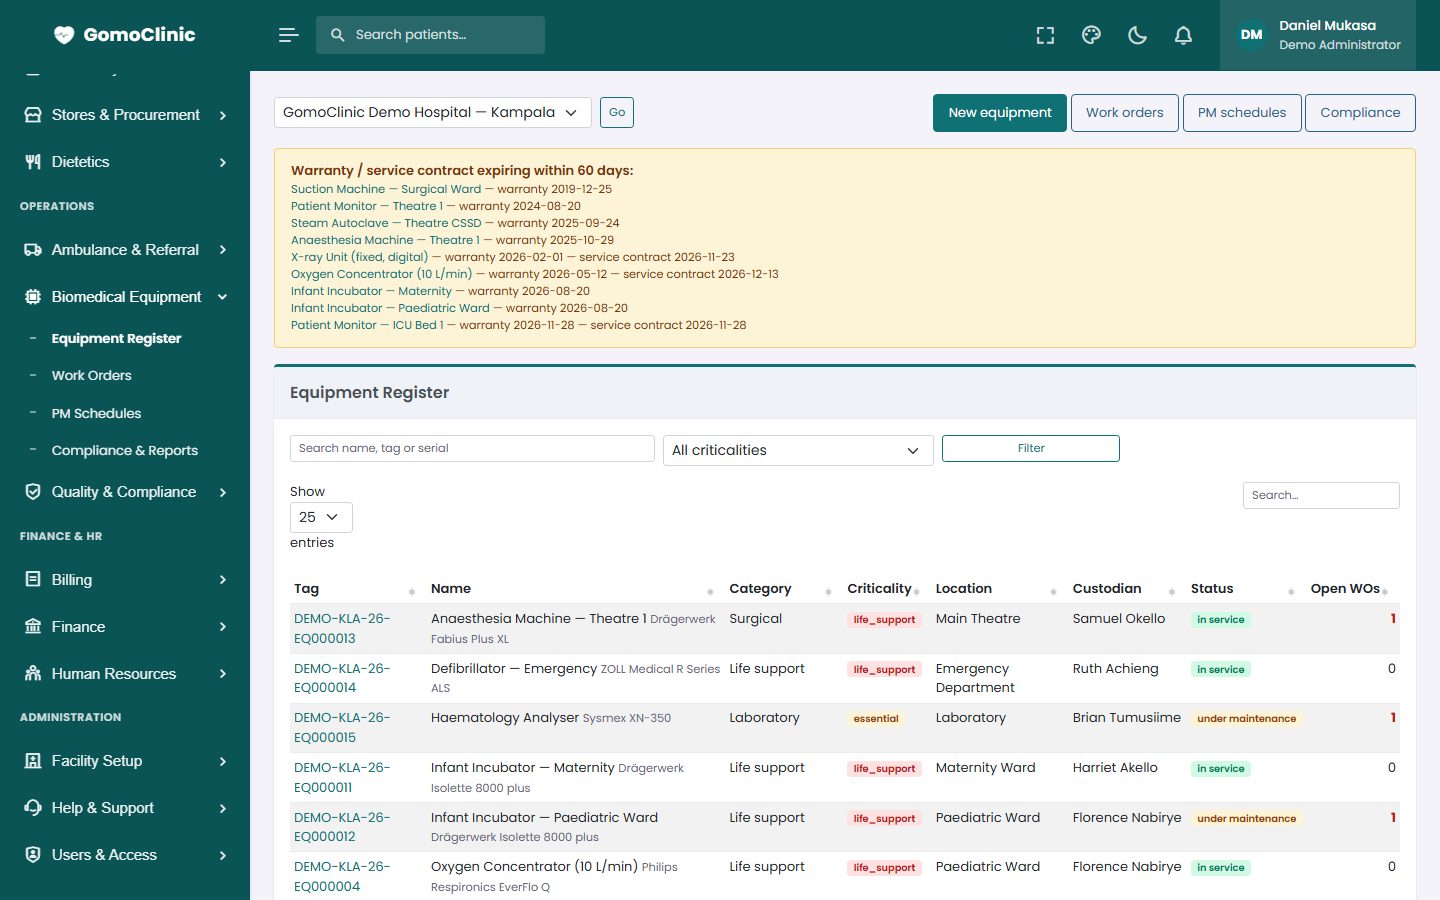
The Equipment Register lists each device with its warranty and service history. Report a fault to raise a work order, and keep preventive maintenance and calibration on schedule.
Ambulance and referrals
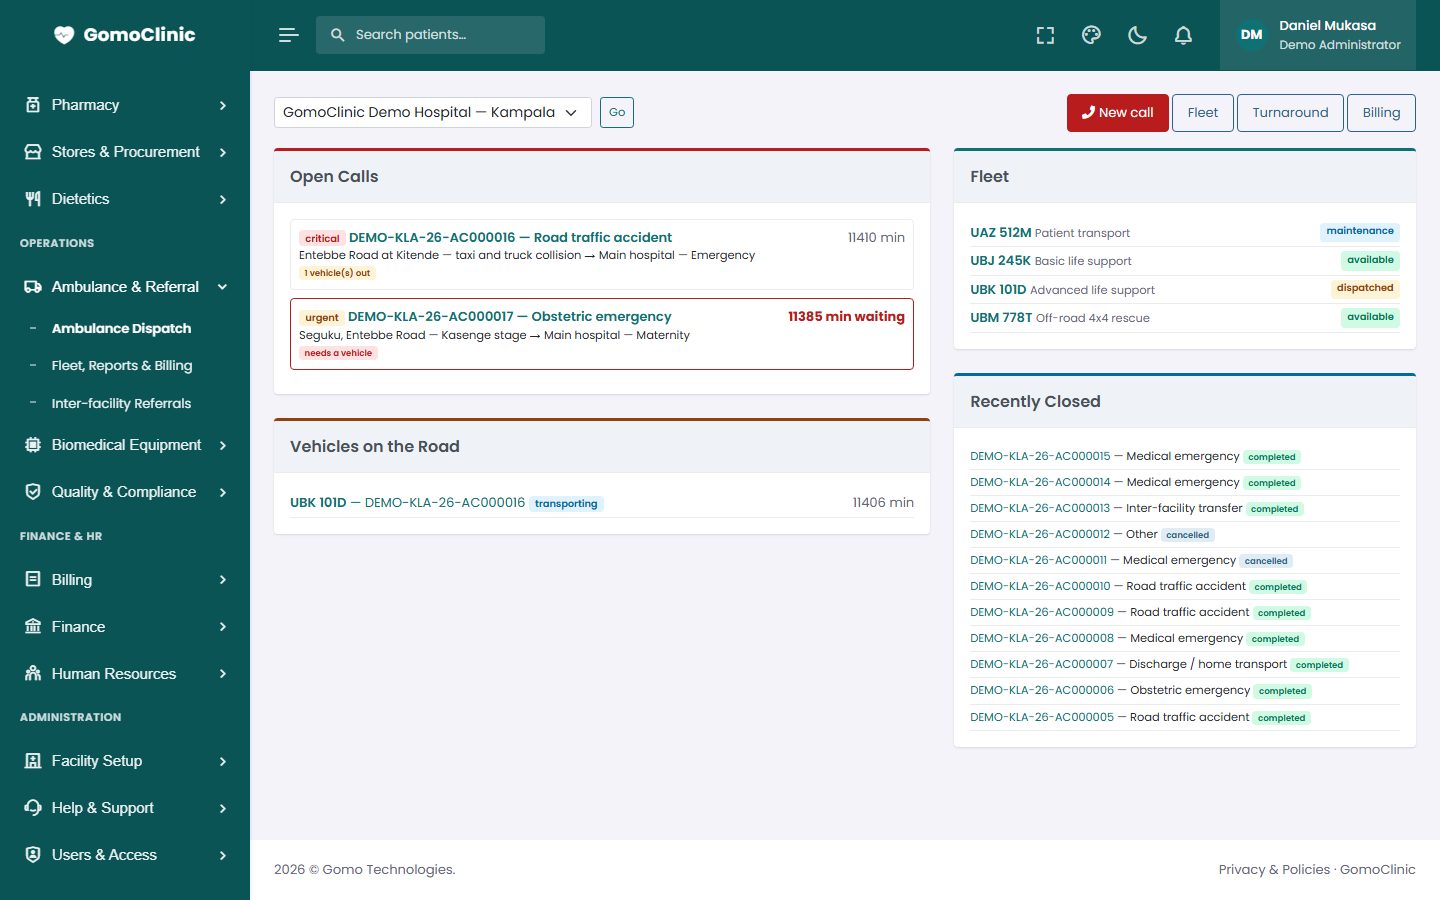
Ambulance Dispatch records calls, assigns a vehicle and crew, and tracks the trip to completion and billing. Inter-facility Referrals tracks patients sent to and received from other facilities.
15Notifications, help and your subscription
Notifications
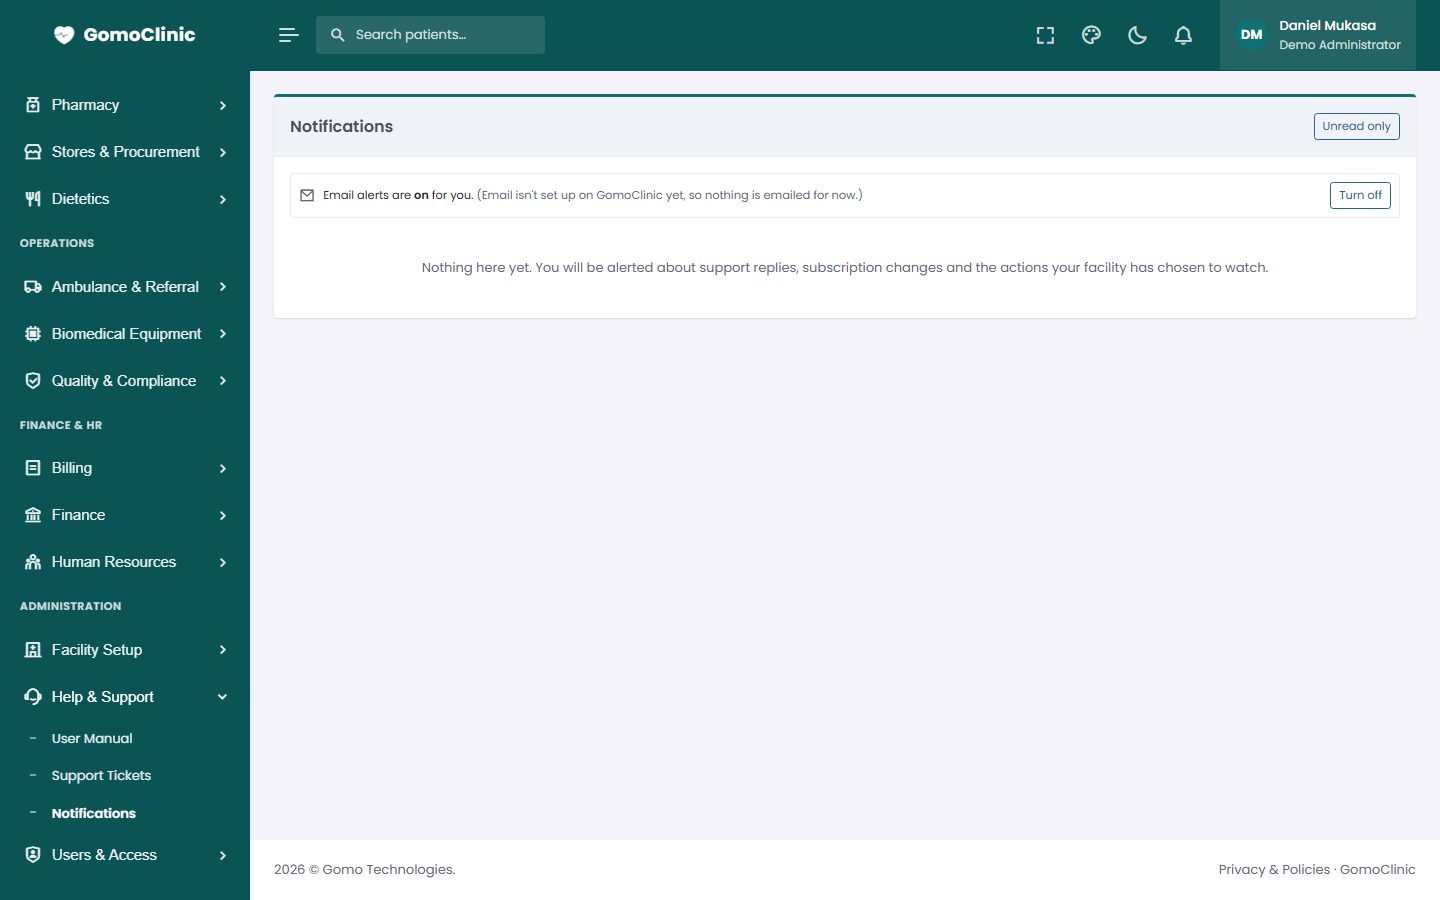
The bell at the top of every page shows your alerts: replies to your support tickets, invoices and subscription reminders, and the actions your administrators chose to watch (for example a new staff account). Click an alert to open what it is about. Help & Support → Notifications lists them all.
If email is set up, alerts can also be emailed to you. Turn alert emails on or off on the Notifications page; account and password emails are always sent.
Getting help from Gomo Technologies
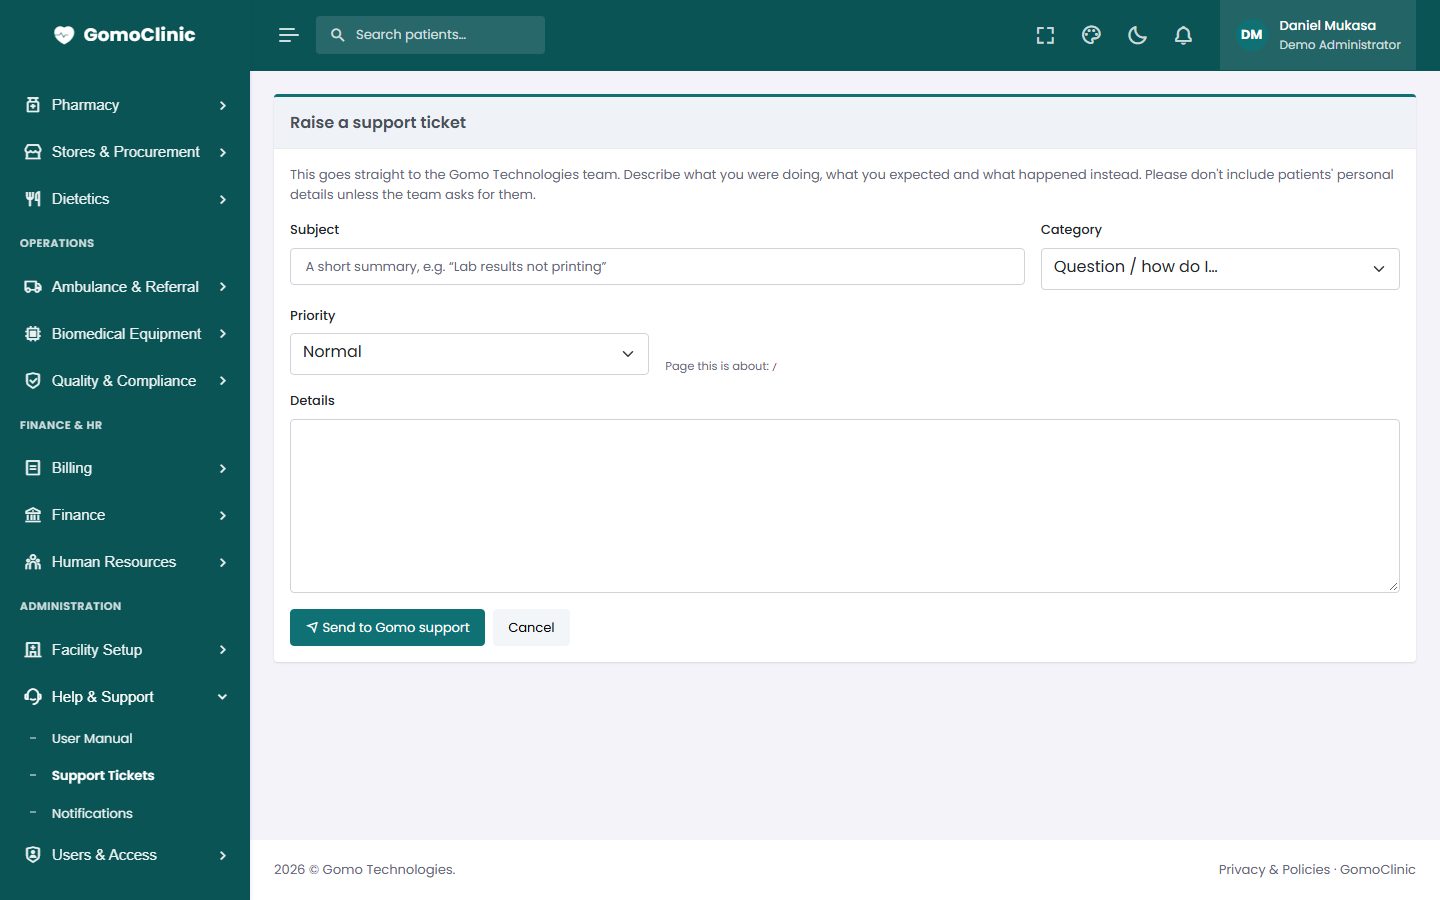
- Click Help & Support → Support Tickets, then Raise a ticket (or use the link at the bottom of the bell).
- Give a short subject, the category (question, problem, feature request, billing, data, sign-in or feedback) and the priority. Choose Urgent only when work is blocked.
- Describe what you did, what you expected and what happened. Please don't include patients' personal details unless asked.
- You are notified each time Gomo replies. Reply on the ticket to add information, and close it with a rating once it is sorted.
Super Admins see every ticket their facility has raised; other staff see their own.
Your subscription
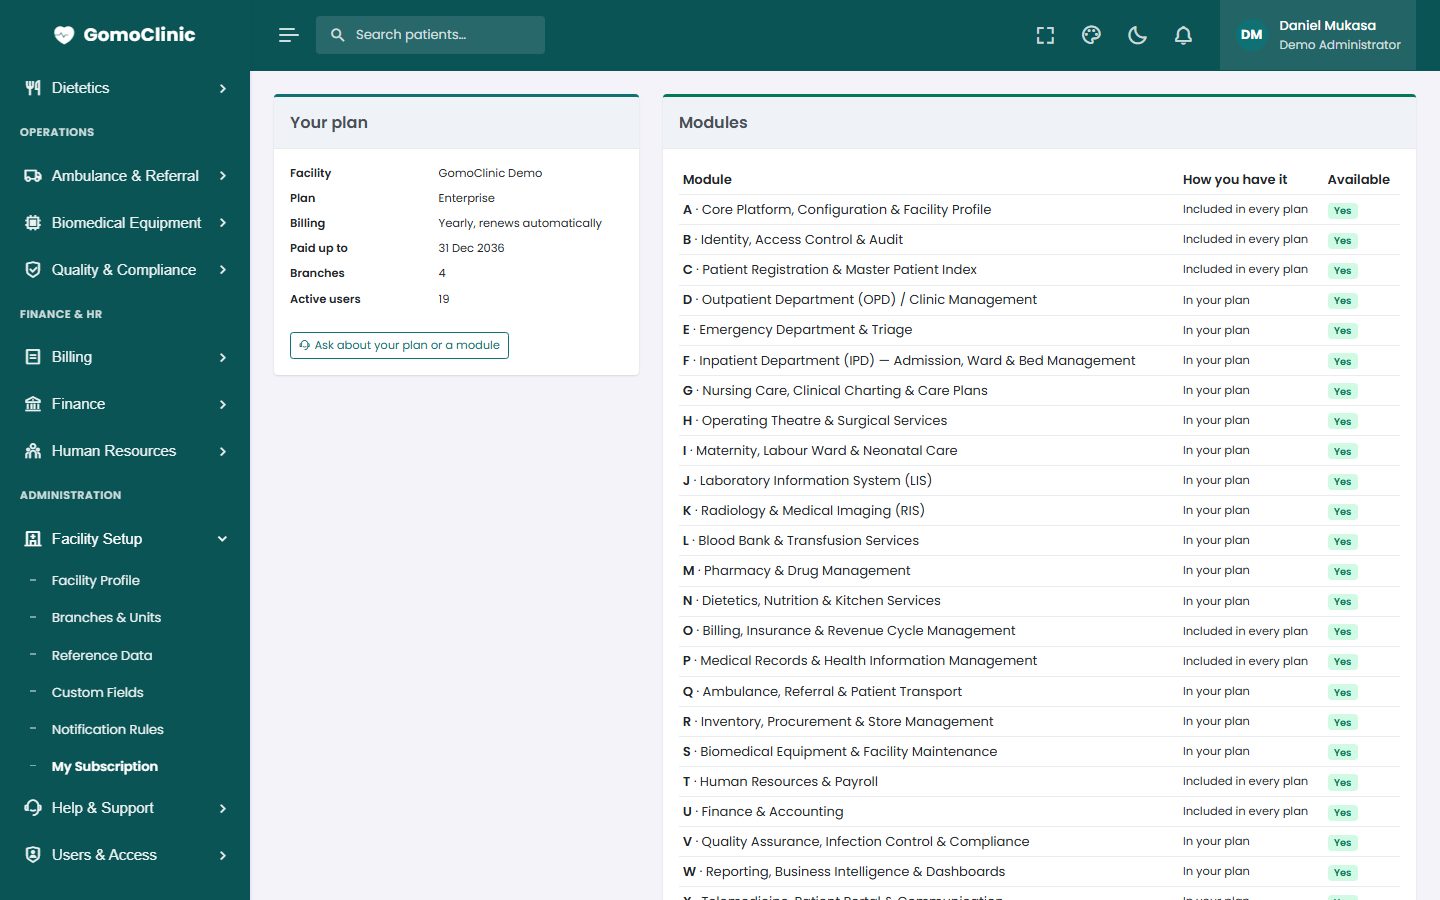
Facility Setup → My Subscription (administrators) shows your plan, billing cycle and paid-up date, the modules you have (including any added for a period), branch and user usage against your plan, and your invoices from Gomo Technologies. You are reminded before the subscription ends; after a short grace period, sign-in is paused until it is renewed. Your records are always kept.
16Administration: staff accounts, roles and settings
This chapter is for your facility's administrators.
Staff accounts
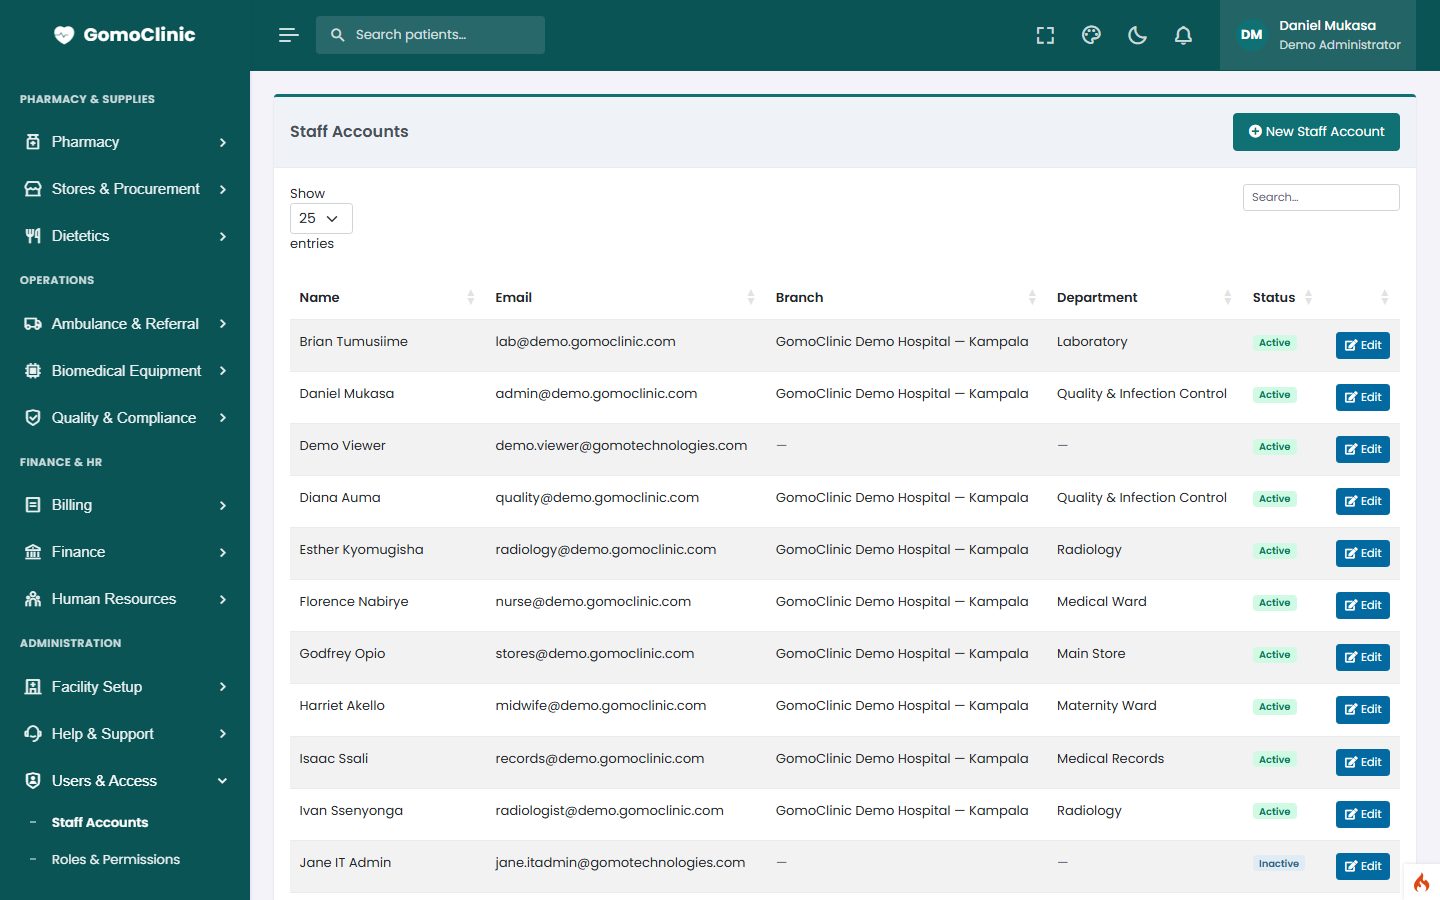
- Users & Access → Staff Accounts → New Staff Account.
- Enter the name and email (each email can only be used once across GomoClinic), the branch and department, and one or more roles.
- Set a starting password. If email is set up, the person also receives a welcome email with a link to choose their own password. They must change the starting password at first sign-in.
- When someone leaves, edit their account and untick Active. Their history stays; they can no longer sign in, and they no longer count towards your plan's user limit.
Roles and permissions
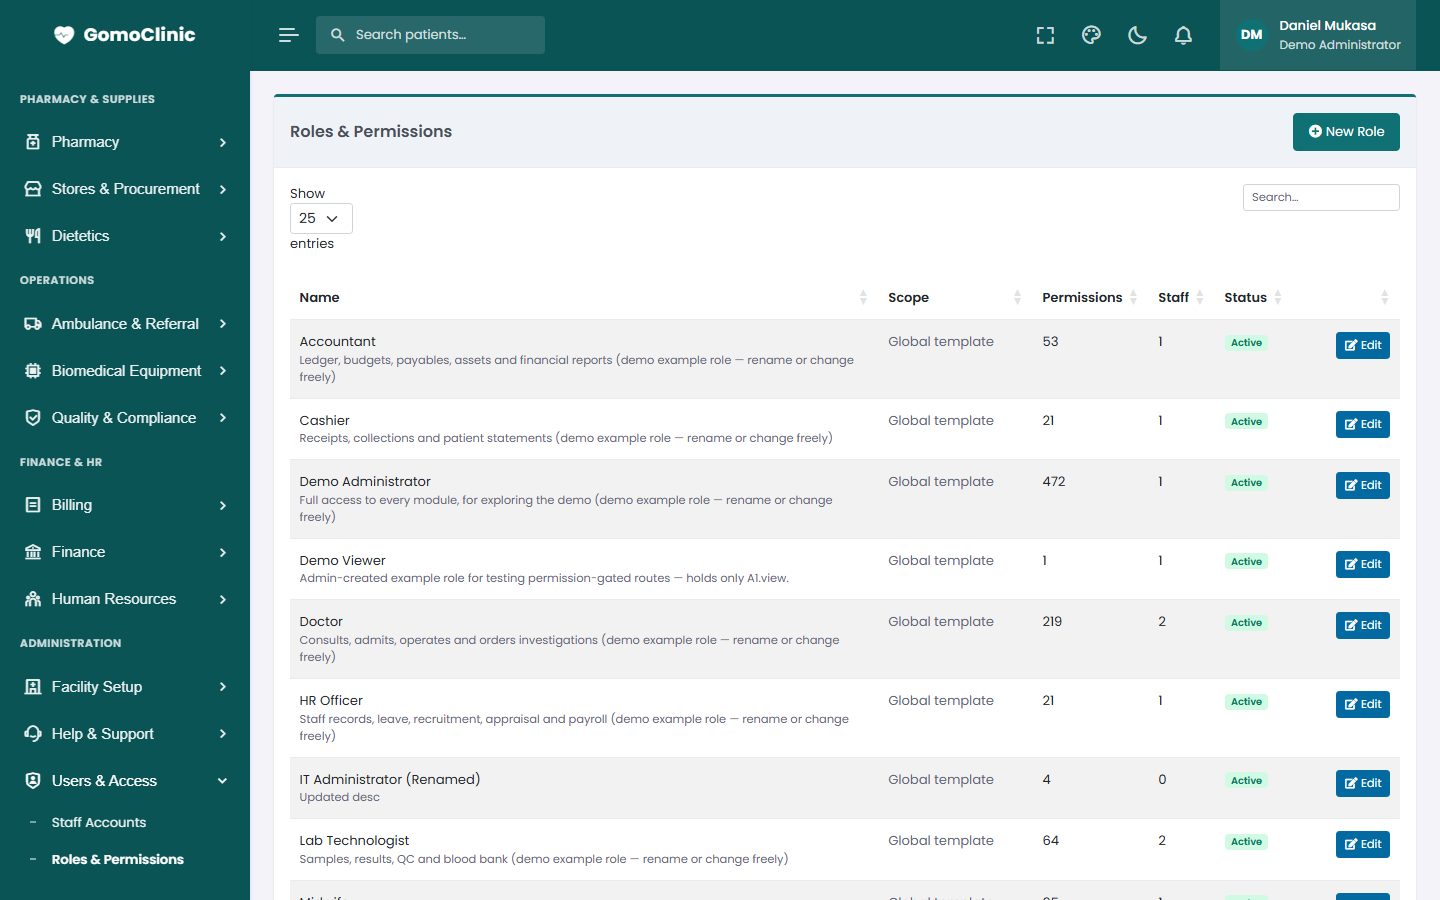
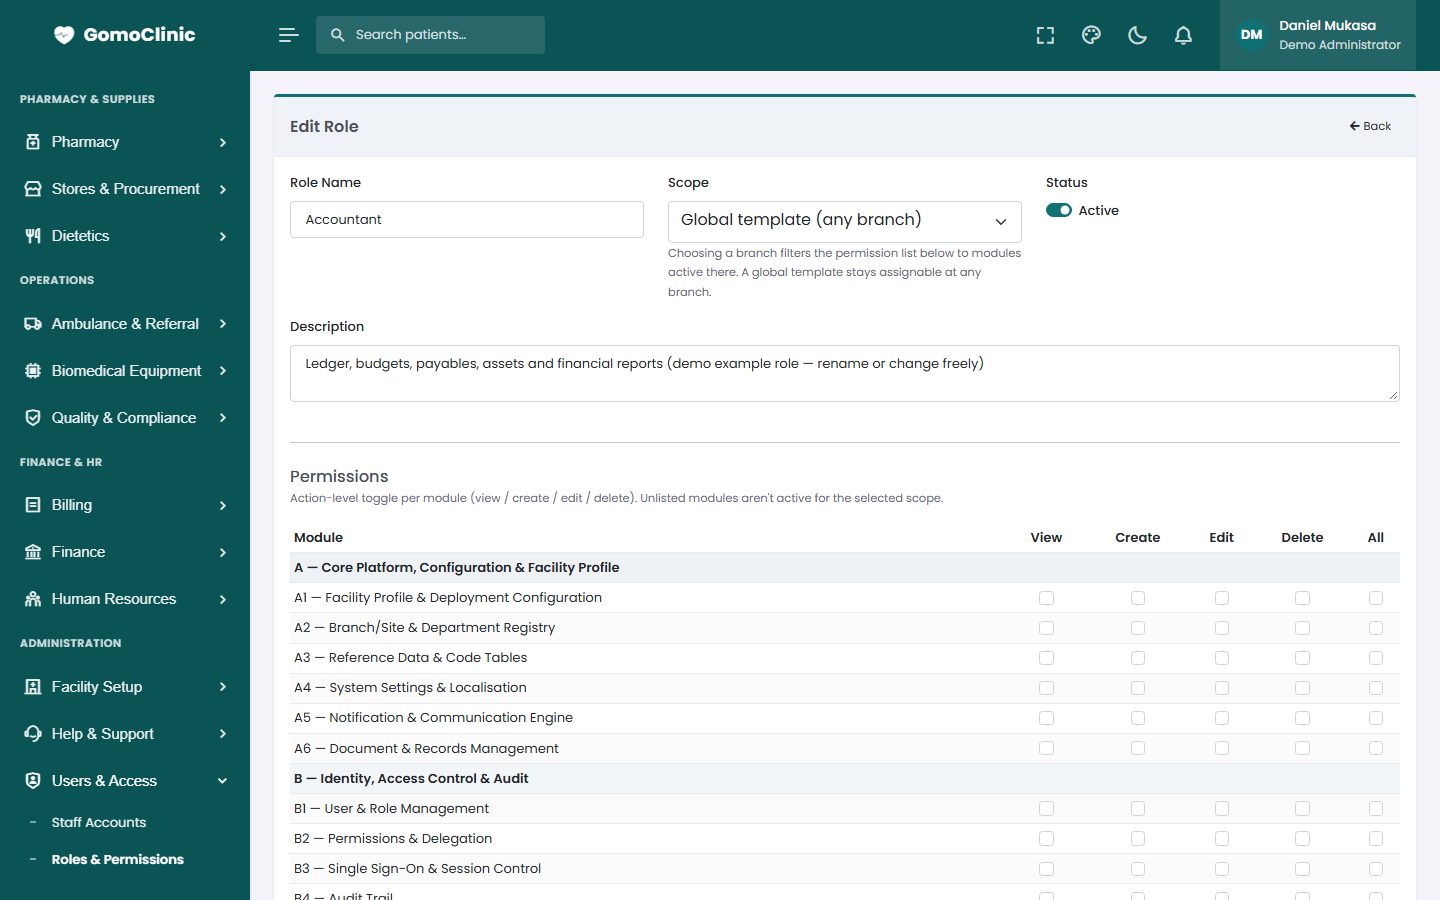
You create the roles your facility needs, with any names you like (for example Pharmacist, Cashier, Lab Technologist). For each role, tick what it may do in each module: view, create, edit, delete. A person can hold several roles, and a role can be limited to one branch. The Super Admin role is fixed and can do everything.
Facility settings
- Facility Setup → Facility Profile: your branches, their facility type, and which modules each branch uses (within your plan).
- Branches & Units: departments, wards, stores and service points.
- Reference Data: every drop-down list in the system (for example payment methods, sample types, incident types). Add, rename or retire values without calling Gomo.
- Custom Fields: extra fields on records your facility needs.
- Notification Rules: choose which recorded actions alert whom, for example alert all Super Admins when a staff account is changed.